Community Pick
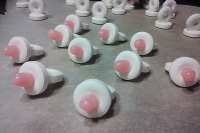
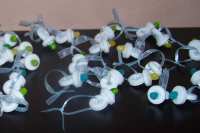
Baby Pacifiers (shower Favors)

"I saw this on an episode of "The Baby Story" a long time ago and dug it out when it was time for my sister's baby shower. Very cute placed on the guest tables at baby showers or on the food buffet table. Also good for playing the "Can't Say the Word" shower game (where every guest is given an item, sometimes it's a clothespin, and they are instructed at the beginning of the shower that they can't say a certain word. each time a guest says that word in conversation to another guest, the offending person must surrender their item/clothespin to the person that caught them. The person with the most items at the end of the shower wins.)."
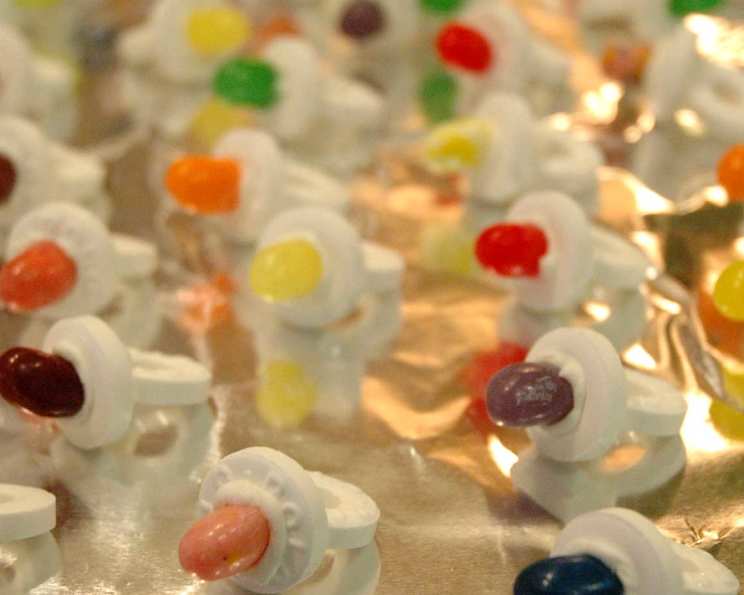
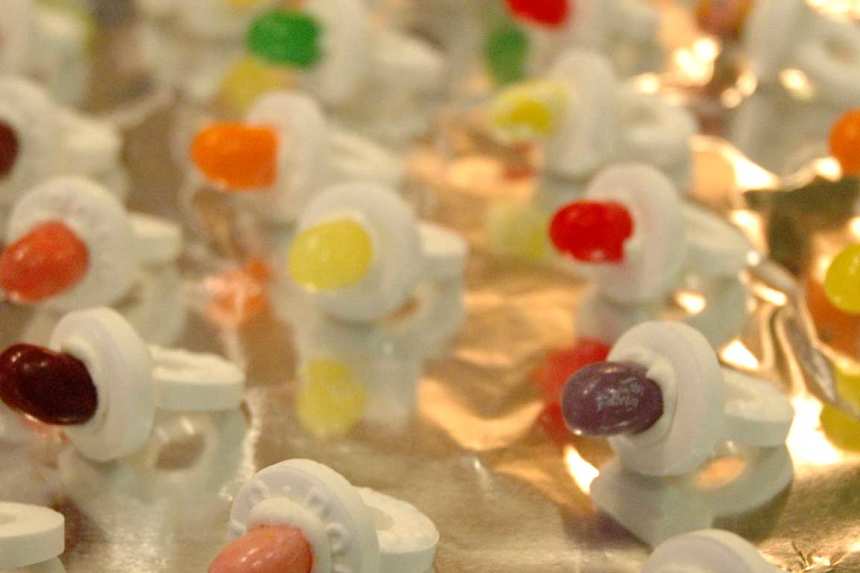
photo by Sackville


- Ready In:
- 20mins
- Ingredients:
- 4
- Serves:
-
24
ingredients
- 2 (737.08 g) bag of white individually wrapped Lifesavers candies (wintergreen, peppermint, your choice)
- 2 dozen jelly belly jelly beans, about 1/2 cup,colors will vary,depending on whether you know the sex of the baby or not,possibilitie
- 170.09 g tube white cake icing, not the gel,that doesn't dry completely,with a thin attachment for application
- 24 lengths of thin curling ribbon, can coordinate with your jellybean colors if you'd like,length to your liking,long enough to fit aro (approx. 24")
directions
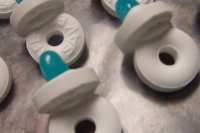
- Unwrap all the Lifesavers.
- Take one Lifesaver and apply a thin layer of frosting around the inner hole.
- Grab a jellybean and place one of the short, ROUND ends in it, so the length of the jellybean is coming out of the hole.
- Flip the Lifesaver over.
- On the other side, take the frosting and make a slightly thicker (yet still on the thin side) layer of frosting around the inner hole/center, and place another Lifesaver perpendicular attaching edge of 2nd Lifesaver to center of 1st Lifesaver with jellybean attached to it.
- Place on flat surface and allow to dry.
- After drying for 3-4 hours, thread curling ribbon through the hole of the 2nd Lifesaver and tie in a knot.
Questions & Replies

Got a question?
Share it with the community!
Reviews
-
 This idea is so cute it should get five stars but I found that there is a problem with the recipe. It is definately necessary to use royal icing. Otherwise, it takes way too long to dry!! I had to recruit my husband to help me hold them while they dried because I didn't use the royal icing. Hopefully everyone else will take the other reviewer's advice, it makes it a ton easier.
 -
 I bought the Jelly Belly Smoothies jelly beans, and used all of the peachish colored ones for the nipples. They looked almost identical to authentic pacifiers! I made up a batch of Royal Icing instead of the tube kind, and they held together perfectly. Thank you for posting the recipe here, at my favorite recipe search site!
 -
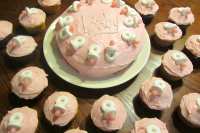
 So cute! I used these for on top of cupcakes for my baby shower
 -
 Cute! Like another reviewer, I skipped the ribbons and used these to top cupcakes for a baby shower. Since the expectant mother didn't know the gender of her baby, I made half of them with pink Jelly Bellies and half with blue, tinting the cupcake icing accordingly. I used Sweet Mint Lifesavers--two 6.25-ounce bags yielded 50 pacifiers. I purchased a bottle of Wilton cookie icing, which came in a bottle much like a glue bottle; it made a quick job of attaching the parts and dried so that the parts were well secured. I attached the Lifesavers together first, and after allowing them time to dry, propped them in a way that made it easy to attach the jelly beans to the other side and allow them to dry upright. They were a big hit--thanks for sharing this fun recipe!
 -
 Just made these for a baby shower I was a hostess for. Some frustration in the beginning! I definitely suggest using the ROYAL icing that dries up very hard and makes a pacifier that is completely edible since guests seem to love to eat these. We used a stiff decorator's icing first,by mistake and it wouldn't set up hard enough to be able to handle these to arrange on trays. Finally realized I didn't have the Royal icing that sets up so hard. I found the meringue mix for it at the craft store and mixed it with water and powdered sugar. I used a tiny pencil size paint brush and just brushed the thin icing on. I did the two lifesavers first then 'glued' the jelly bean in the hole with the icing and set them up in a mini muffin pan (two to a hole) to dry. I tied small 1/4" gingham ribbon in pink, blue, yellow, green and purple on the handles to match the jelly beans. I put them on a glass pedestal cake plate on the sign in table with the flower arrangement and they looked so adorable. To my surprise many guests took one when signing in and when I looked out during the shower...I saw many ladies sitting there sucking their pacifiers!! It was a sight and good picture op. Out of the 30 my daughter and I made there were none left. The kids really loved eating them, too. I used the new Sweet Mint flavored life savers, picked gingham ribbon to match our theme and went to Target where you could buy jelly beans in individual colors. Too cute.
see 41 more reviews
RECIPE SUBMITTED BY

<p>I firmly believe everything tastes better when you had nothing to do with the preparation or clean up. <br /><br />I used to have a few favorite cookbooks, but this site has easily replaced them....I love the ease of searching for exactly what I need and the feature of seeing what others have rated the particular recipe. <br /><br />I'm a mother to 2 kids. I stay at home and provide childcare so I can be with them during the day. <br /><br />For fun I enjoy reading, shopping & movies, as well as getting together with friends & family for games & cards. LOVE to travel when the $ is available. BIG into Jimmy Buffett.</p>


