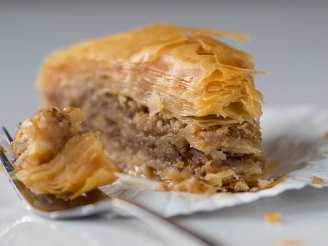
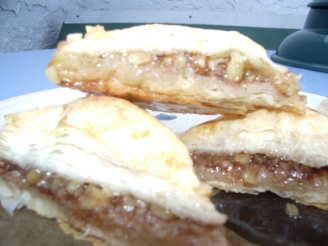
Baklava

"If you are satisfied with the tasteless baklava that you pick up from your local middle eastern deli or you are blessed with a deli that actually makes great baklava, don't ever make this. It is a lot of work, and usually takes 2 days unless you want to work yourself to death... and then you have to eat it all... or lay it off on neighbors and friends... but only VERY GOOD friends! It will keep for a week at room temperature or a couple weeks in the fridge, if you don't mind it being soggy. It does not freeze well! The inclusion of graham cracker crumbs destroys authenticity, but makes for a much flakier pastry. Prep time does not include cooling time for finished baklava."
- Ready In:
- 4hrs
- Ingredients:
- 21
- Yields:
-
24 pieces, about
ingredients
- 10 double graham crackers (about 1/3 of 1 lb package)
- 12 ounces shelled walnuts
- 12 ounces unsalted shelled pistachios
- 1⁄2 cup brown sugar, firmly packed
- 1 teaspoon ground cinnamon
- 1⁄2 teaspoon ground cloves
- 1⁄4 teaspoon freshly grated nutmeg, more to taste
- 1⁄4 teaspoon ground allspice
- 1⁄2 - 1 teaspoon salt (desirable) (optional)
- 2 -4 tablespoons orange flower water (preferred) or 2 -4 tablespoons rose water (available at Middle Eastern markets)
- 1 lb unsalted butter, melted and cooled until warm
- 1 (17 1/4 ounce) package frozen phyllo pastry sheets, thawed in refrigerator
-
Orange Scented Syrup
- 3 cups sugar
- 2 cups water
- 1⁄4 cup orange blossom honey
- 1 teaspoon vanilla extract
- 1 lemon juice, and zest of grated
- 2 slices orange rind (if desired, squeeze juice into water)
- 1 cinnamon stick (optional)
- 3 whole cloves (optional)
- 2 -4 tablespoons orange flower water (preferred) or 2 -4 tablespoons rose water (available at Middle Eastern markets)
directions
- Preheat oven to 300 degrees F.
- Grind graham crackers in food processor until as fine as breadcrumbs.
- Sift out about 1/3 cup of the finest, and set them aside.
- Place remainder in a medium bowl.
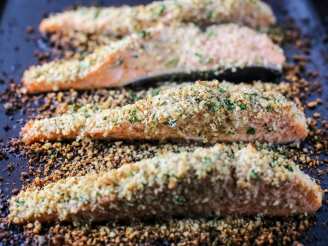
- Spread walnuts and pistachios on a baking sheet, and toast at 300 degrees F for about 15-20 minutes, until quite fragrant but not smelling overcooked, stirring every 5 minutes.
- Allow nuts to cool completely, place in food processor, and pulse until most of the nuts are medium-fine, but not too fine.
- Transfer to bowl with graham cracker crumbs.
- Add cinnamon, cloves, nutmeg, and allspice.
- and mix together until well combined.
- Taste, and add optional salt if desired.
- Sprinkle with orange flower or rose water, 1 Tbsp at a time, stirring between additions, until it tastes good to you.
- Return mixture to baking sheet, and place it in the oven.
- Reduce heat to 225 degrees F, and dry for about 20-30 minutes, stirring every 10 minutes.
- Mixture should still be slightly damp.
- Remove from oven, allow to cool, and return to bowl.
- While nuts cool, start to make the syrup.
- Combine all ingredients, except orange flower or rose water in a saucepan, and bring to a boil, stirring to dissolve sugar.
- Reduce the heat and let simmer for 10-20 minutes, until thickened and temperature reads 220 degrees F on a candy thermometer.
- Remove the orange peel, cinnamon stick, and whole cloves, and set aside to cool.
- When just warm, add orange flower water or rose water to taste, stir well, and refrigerate.
- Syrup must be no warmer than room temperature when poured over the baklava, or it won’t soak in well.
- Brush a 13"x9"x2" baking pan with melted butter, and set aside.
- If using large sheets of phyllo, cut a piece of cardboard into a 13"x9" rectangle.
- Unroll the phyllo dough and lay the sheets flat on a work surface.
- Set the cardboard template on the stack of phyllo and trim the excess so they fit the pan.
- Keep the pastry covered with a damp, not wet, towel as you work to prevent drying out.
- If using smaller 9"x14" sheets, use as is.
- In either case, you should have 30-40 phyllo sheets available.
- To build the baklava, you will alternate 3 layers of dough with 2 layers of nuts.
- If using 40 phyllo sheets, use 15 each for the top and bottom layers and 10 sheets between the nut layers; use about the same proportions if using a different number of sheets.
- This will make a nice, almost 2" thick, baklava, but will still leave a little room in the pan for adding the syrup.
- Start with a stable base of 15 sheets on the bottom, brushing each with melted butter and sprinkling each with about 1/4 to 1/2 Tsp of the fine graham cracker crumbs, just enough to help keep the sheets separated.
- Squeeze out big air bubbles as you go, but don’t squeeze the layers together any more than necessary.
- The purpose of the butter and crumbs is to keep the phyllo layers separated and the final product flaky.
- Spread half of the nut mixture evenly over the stacked sheets, and drizzle lightly with butter.
- Cover with 10 sheets of phyllo, painting each with melted butter and sprinkling with crumbs as before, then top again with remaining nut mixture, and drizzle lightly with butter.
- Top the last layer of nuts with the remaining sheets of phyllo as you did for the bottom.
- Drizzle or brush any remaining butter over top.
- Depending on desired size, cut the baklava lengthwise into 4-5 strips using a very sharp knife.
- Be sure to cut all the way to the bottom of the stack.
- Then, make similar slices at a 45 degree angle to the first ones to get the classical diamond shaped pieces of baklava.
- Again, be sure to slice all the way to the bottom of the stack.
- Preheat oven to 350 degrees F, and bake the baklava for 30 minutes in the middle of the oven, rotating after 15 minutes.
- Reduce heat to 300 degrees F, rotate the pan again, and bake for another 20-30 minutes, rotating every 10 minutes, until baklava is a nice, light golden brown on top.
- Remove baklava from oven and remove a corner piece of the baklava, tilt the pan down toward that corner to allow the butter, if any, to collect in the corner.
- Spoon out the butter (or suck it out with a turkey baster; much easier!), and discard.
- With the pan again sitting flat, ladle the cooled syrup evenly over the very hot baklava, starting over all the cuts in the stack, so the syrup soaks in.
- Allow to stand until completely cooled to room temperature, at least several hours, before serving.
- If desired remove excess syrup as you did with the butter.
- You will have excess syrup, but that’s what makes this good!
- But what makes it soggy after a couple of days!
Questions & Replies

Got a question?
Share it with the community!
Reviews
-
 Fantastic! I was skeptical when I saw graham crackers, but jumped in anyway because one of the characteristics of most baklava is a tough bottom layer from all the sheets compressed together. The crackers were the solution-and they don't add any taste. The tip for draining the butter after baking is brilliant. This is a perfect baklava and don't be scared off my Toby's warning of lots of work. It is worth every well instructed second. MeMaw
RECIPE SUBMITTED BY

Toby Jermain
Houston, TX
I WAS retired oilfield trash since 1999, who has lived in Houston TX for the last 25 years, though I'm originally from California. I'm Texan by choice, not by chance! I am now working in Algeria 6 months a year, so I guess that gives new meaning to the term SEMI-retired. I grew up in restaurants and worked in them for 13 years while getting through high school and college, working as everything from dishwasher to chef, including just about everything in between. At odd intervals I also waited tables and tended bar, which gave me lots of incentive to stay in school and get my engineering degree.
During the 33 years since, I have only cooked for pleasure, and it HAS given me a great deal of pleasure. It's been my passion. I love to cook, actually more than I love to eat. I read cookbooks like most people read novels.
My wife and I both enjoy cooking, though she isn't quite as adventurous as I am. I keep pushing her in that direction, and she's slowly getting there.
We rarely go out to eat, because there are very few restaurants that can serve food as good as we can make at home. When we do go out, it's normally because we are having an emergency junk-food attack.
My pet food peeves are (I won't get into other areas): are people who post recipes that they have obviously NEVER fixed; obvious because the recipe can't be made because of bad instructions, or that are obvious because it tastes horrible. I also detest people who don't indicate that a recipe is untried, even when it is a good recipe. Caveat emptor!