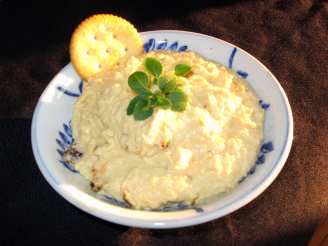
Dried Tomato Hummus With Pita Crackers

"A recipe from Michael Smith"


- Ready In:
- 20mins
- Ingredients:
- 12
- Yields:
-
2 cups
ingredients
-
For the Hummus
- 1 -19 ounce chickpeas, drained and rinsed
- 1⁄2 cup tahini (sesame paste)
- 1 cup plain yogurt
- 1 teaspoon hot sauce
- 1 lemon, juice and zest of
- 2 garlic cloves, chopped
- 1 cup sun-dried tomato packed in oil
- salt & fresh ground pepper
-
For the Pita Crackers
- 4 pita bread
- 1 tablespoon olive oil
- 1 tablespoon honey
- salt & fresh ground pepper
directions
- For the Hummus: Puree the chickpeas in your blender or food processor. Add tahini, yogurt, hot sauce, lemon juice and zest, garlic, salt and pepper. Keep pureeing and add tomatoes. Check your consistency here and if you prefer add a bit more yogurt or a little splash of water to thin the texture. Now taste and adjust your seasoning and you’re ready for the dippers!
- For the Pita Crackers: Preheat your oven to 350 °F (180°C).
- Whisk the oil and honey together and brush both sides of each of the pita chips. Sprinkle with salt and pepper. Cut in 6 or 8 wedges, transfer to a cookie tray and bake until they begin to turn golden brown, about 10 minutes or so. Begin peaking in the oven every minute or so until the chips and continue baking until all the chips are evenly golden brown, not just the ones on the edge. Remove any that finish ahead of the pack and keep tanning the rest. Now you’re ready to dip and share!
Questions & Replies

Got a question?
Share it with the community!
Reviews
Have any thoughts about this recipe?
Share it with the community!
RECIPE SUBMITTED BY

<p><strong><span>I'm the host of Bargain Basement tag game in the cooking game forum. You're welcome to play anytime. You'll be surprised to find great recipes that were never reviewed. <br /></span></strong></p>
<p>~~~~~~~~~~~~~~~~~~~~~~~~~~</p>
<p><strong><span>I want to say a big thank you to everyone who tries my recipes and post photos. I don't always have the time to say thanks to each of you but be sure it's so appreciated :)</span></strong></p>
<p>~~~~~~~~~~~~~~~~~~~~~~~~~~</p>
<p> </p>
<p><img src=http://i195.photobucket.com/albums/z205/jubespage/zwt6%20banners%20and%20photos/captain.jpg alt=width=150 height=200 /></p>
<p><br /><img src=http://i27.photobucket.com/albums/c175/emmyduckie/zwt/ZwizzleBadge.jpg alt=width=200 height=300 /><br /> <br /><a title=banner3 href=http://www.flickr.com/photos/26630178@N05/3510953178></a><img src=http://farm4.static.flickr.com/3387/3510953178_b35b3086a8.jpg alt=banner3 width=500 height=250 /> <br /><img src=http://i23.photobucket.com/albums/b399/susied214/permanent%20collection/captain.jpg border=0 alt=Photobucket /> <br /><img src=http://i23.photobucket.com/albums/b399/susied214/permanent%20collection/PAC08Main.jpg border=0 alt=Photobucket /> <br /><img src=http://i23.photobucket.com/albums/b399/susied214/permanent%20collection/adoptedspring08.jpg border=0 alt=Photobucket /> By Brooke The Cook in WI <br /><img src=http://i147.photobucket.com/albums/r317/j_welcome/pics2/food/PRMRcopy.jpg alt=/ /> <br /><a href=http://www.recipezaar.com/bb/viewtopic.zsp?p=3510511#3510511> <br /> <br /><img src=http://i23.photobucket.com/albums/b399/susied214/projects/200_PACpic.jpg border=0 alt=Photo /> <br /> <br /></a><a title=Photo href=http://www.flickr.com/photos/boomette1/514183676></a><img src=http://farm1.static.flickr.com/252/514183676_f79b486466_m.jpg alt=good width=240 height=137 /> <br /><img src=http://i23.photobucket.com/albums/b399/susied214/permanent%20collection/Adopted1smp.jpg border=0 alt=Photo /> <br /><img src=http://i23.photobucket.com/albums/b399/susied214/permanent%20collection/smPACp.jpg border=0 alt=Photo /></p>
<p><img src=http://img.photobucket.com/albums/v726/annacia/Permanent%20Banners/ZTAA-sm.jpg border=0 alt=Photobucket /></p>
<p><img src=http://i21.photobucket.com/albums/b280/carolinamoon21/Ingredients/BANNERS/Pets-STKR.jpg alt=width=200 height=200 /></p>