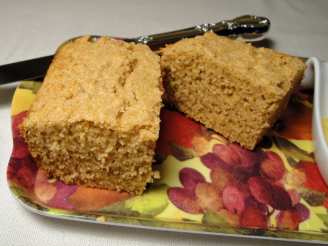
Foolproof Whole-Wheat Bread With Your Vitamix Blender

"The VitaMix is great for making whole-wheat flour. Forget about buying the "dry blade" container -- the "wet blade" container works just fine, as long as you keep the quantity of wheat berries down to about a cup. This recipe comes from a friend in Texas, who used to be a professional baker. It is marvelous, and oh-so simple. Nothing beats the smell or taste of hot, whole-wheat bread!"


- Ready In:
- 1hr 5mins
- Ingredients:
- 6
- Yields:
-
2 Loaves
ingredients
- 2 1⁄2 cups water
- 1⁄2 cup honey-molasses (adjust mix to taste)
- 2 tablespoons active dry yeast
- 5 cups whole wheat flour
- 1⁄2 cup wheat gluten
- 1 teaspoon salt
directions
- Mix thoroughly water and honey-molasses, raise temperature to 108-112 degrees. Temperature is VERY important for proper yeast action.
- Stir in yeast and set aside for 10-15 minutes for yeast to work. When ready, there should be at least a 1” topping of foam on the mixture.
- While yeast is working, put a cup of whole wheat grain (i.e., the whole kernels or berries) in the VitaMix blender and grind for ONE MINUTE. Make sure the blender container is completely dry when this is begun. Put the wheat flour in a large mixing bowl. Repeat this process three more times. Note: I only have the “wet-blade” container, and is seems to do a marvelous job of making flour from grain but works best with smaller quantities of grain. This is why I grind one cup at a time. I have found that 4+ cups of whole wheat berries yields about five cups of whole-wheat flour.
- Add gluten and salt to the whole-wheat flour and stir briefly to blend the dry ingredients.
- Add yeast mixture and stir with a wooden spoon or spatula. When ingredients are lightly mixed, dump everything out onto the kitchen counter, in a spot that has been cleaned and lightly oiled. Note: I hand-knead dough, so I use rubber or light plastic gloves to keep the dough off my hands -- and out of my rings!. If you have a mixer with dough hooks, so much the better.
- Knead the dough for five minutes, adding small amounts of water to keep the dough just barely on the sticky/gooey side. Put the dough back in the mixing bowl. It’s hard to explain exactly what the consistency should be, but I try to keep the mixture sticky and quite moist. To add water, I make a depression in the dough and put in the water, then fold the dough over on itself. Kneading is fun! At least I think so. I flatten the dough with the heals of my hands, fold it end-for-end, repeat.
- Put about two inches of hot water (110-120°F, decidedly warm to the touch, but not uncomfortably warm) in the sink and “float” the mixing bowl with dough in the sink. (It won’t float with that little water, but you get the idea.) Cover the dough with a light cloth. The warm water will keep the dough warm and moist while it raises. Let dough raise about 30 minutes, or until it doubles in size.
- Dump the dough back onto the counter top and knead again for two or three minutes. This will reduce the size of the dough as the air pockets are pressed out. Divide dough into two equal lumps, and form into the shape of loaves to fit bread pans. (Note: If you want to freeze half the dough for later use, now is the time to do it.) Oil and lightly flour the pans if they do not have a non-stick surface. Place each lump into a warmed bread pan, put these on the counter, and cover with a dry cloth. Note: I generally warm the pans by floating them in the sink, after I’ve removed the bowl in step 7. Allow the dough to rise a second time, which usually takes about a half-hour. The bread is ready when it has raised to about a half-inch above the height of the bread pan.
- Cook at 360°F for about 35 to 40 minutes. When done, remove the bread from the bread pans and let cool (if you can stand the wait!) for about 10 to fifteen minutes before cutting and eating. Nothing is better smelling and tasting than fresh, hot, whole-wheat bread!
- One final note: We live at an altitude of 4000 feet. The lower air pressure makes yeast work a little more quickly, and generally more liquid and a higher cooking temperature is required. However, this recipe was originally used in Texas, so it’s probable no modifications are necessary.
Questions & Replies

Got a question?
Share it with the community!
Reviews
-
 I'm so excited to try this! I recently got a Vitamix, but didn't pay extra for the dry-blade. I was bummed that I couldn't grind flour, so I'm very happy to see this recipe and learn that I can do it with the wet-blade anyway! Yay!
 -
Great recipe for a beginner like me! Thanks for including the little details that I wouldn't have known otherwise, such as letting the yeast prepare beforehand for 15 minutes, and how long it takes to knead the bread and how long it takes to rise, etc. Love the idea about putting the bowl in the warm water! My bread came out perfectly, even though it's the first time I've done it myself instead of using the breadmaker!