Community Pick
Hershey's Old Fashioned Rich Cocoa Fudge

"This is a crumbly, sugary old fashion fudge....from the back of the Hershey's Cocoa can. Cook time is cooling time. If you are having trouble with it "setting up", you probably didn't cook it long enough. I have learned (the hard way!) to not trust my candy thermometer and to use to soft ball stage water test to make sure it is the right temperature. Even under cooking it by 2-3° will result in a soft, sticky mess. It still taste good though. :)
Some good suggestions from reviewers: (I highly recommend reading through all the reviews before making this fudge!)
- don't try to bring up temp too quickly
- a large shallow saucepan works better than a deeper one"

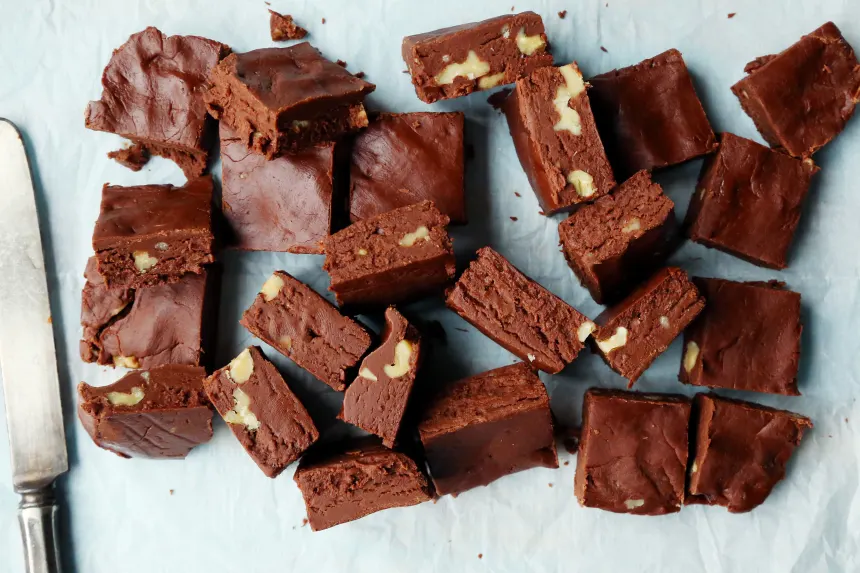
photo by Jonathan Melendez


- Ready In:
- 3hrs 10mins
- Ingredients:
- 6
- Serves:
-
36
ingredients
- 3 cups sugar
- 2⁄3 cup cocoa
- 1⁄8 teaspoon salt
- 1 1⁄2 cups whole milk, no substitute
- 1⁄4 cup real butter, no substitute
- 1 teaspoon vanilla extract
directions
- Line 8 or 9 inch square pan with foil; butter foil.
- In large heavy saucepan stir together first three ingredients; stir in milk, with a wooden spoon*.
- Cook over medium heat, stirring constantly, until mixture comes to a full rolling boil.
- Boil without stirring, to 234 degrees F on a candy thermometer (or until syrup, when dropped in very cold water forms a soft ball which flattens when removed from water). Bulb of candy thermometer should not rest on bottom of pan. (This can take 20-30 minutes).
- Remove from heat. Add butter & vanilla.
- DO NOT STIR! Cool at room temperature to 110 degrees F (lukewarm). (This can take 2 to 2-1/2 hours).
- Beat with wooden spoon until fudge thickens & loses some of its gloss. (This can take 15-20 minutes. It really works best if you have someone to 'tag-team' with.) It starts to look more like frosting than a thick syrup when it is ready.
- Quickly spread into prepared pan; cool.
- Cut into squares.
- Store wrapped loosely in foil in the refrigerator.
- *it is very important not to use a wire whisk or the fudge will not set up. Also just stir gently, even though the cocoa will stay floating on top, it will mix in as the mixture heats up.
Questions & Replies

-
I'm a little confused. Takes 30 minutes of constant steady stirring to get it to a boil. Clearly it says not to stir it for the 20-30 minutes that its boiling. Wont that burn it? Medium heat to me is half way on my stove switches. Is that right or should it be turned down? Never made fudge but I'm a good cook. Just dont want to burn it.
-
 Fudge didnt set, had to add water and bring back up to soft ball stage. When I take it ove the stove do i add butter and vanilla again, or just start stirring again?
 -
when can i add the nuts?
-
Do you stir in the butter and vanilla just to combine it or just put in butter and vanilla and not stir until temp is at 110
-
 How to print?
see 20 more questions
Reviews
-
 this is the best Fudge recipe ever. My dad made this for many many years and taught me to make it. I have been making it now for about 50 years.. It always takes my stove 45 min at least to get it to the soft ball. Do not stir to much while cooking.. We bring it to a small boil and keep it boiling. use ONLY A WOODEN spoon..(.Check your candy thermometer before to see if it is accurate by boil water and see if it boils at exactly 212. then you know if your candy thermometer is right.) We always also checked candy by dropping a small spoonful in a cup of very cold water when we thought it was done. it would form a small ball with your fingers. Then you knew it was done. We never let our set as long as these directions. Cooled in a pan of cold water about three to five min and then beat with a wooden spoon only till it loses its shine. This is no doubt the best candy in the world.. my son gets ever year at Christmas time.. at his request. :) ..This is a hard candy to make but well worth the effort..
 -
This is a post script to my review. Add a big handfull of walnuts with the butter and vanilla at the end of the cooking portion not after it is cooled down as that will bring the temp down and make the fudge grainy instead of creamy.
-
 I love this recipe; however, the version on Cooks.com has the taste I remember from childhood. Instead of whole milk, it calls for 1 c. evaporated milk and 1/2 c. water. If you are following this recipe it is easy to overbeat; it should just be beaten until it loses some of the gloss - not for 10-15 minutes.
 -
 I make this recipe all the time and never have any problems unless the pan is too small and it boils over. I bring the fudge to a softball stage by testing it in cold water. No thermometer. After it reaches the softball point, I remove from heat and add the butter and vanilla and immediately begin stirring with a mixer. It takes approximately 10-15 minutes before i start seeing wrinkles in the fudge after that I know that it is almost ready to pour into the pan for cooling. Everyone wants me to make this, it is quite time consuming though. Total about an hour. I also make peanut butter fudge this way but instead of the cocoa I substitute 2/3 cup of peanut butter and add it at the end with the butter and vanilla.
 -
Maybe this will help some.Remember 30-10-20.It takes me 30 minutes of stirring until it boils.Then let it boil 10 minutes.Then i let it cool 20 minutes.Im sure you could let it cool longer but 20 minutes works for me.The 10 minutes of boiling is the most important.Hope this helps.
see 104 more reviews
Tweaks
-
 I added chopped walnuts to the fudge (during the stirring process) for a nice added crunch and texture.
 -
Do not constantly stir while it is cooking, or the texture will not set. My mom made this for years.
-
I didn't tweak anything per se, but I do help the cool down process by streaming the fudge. In other words, I beat it and then take large spoofuls and drop or stream it back in the pan. When the ribbons of fudge as dropped from the air begin to retain their ribbon form, I pour the fudge onto the pan.
-
I have been making this fudge for 50 years now it truly is the best. My daughter in law is vegan so no dairy products at all. The recipe clearly states no substitutes. I decided to get crazy so I used almond milk and a non dairy butter. Guess what folks it not only came out perfect it tasted exactly the same. Your vegan friends will love you for this. My DIL said it is the best fudge she has ever had even before she was vegan. She has been vegan for 12 years now. My son has ciliac disease so he is strict gluten free. It used to be a nightmare having them for dinner. I have learned a lot about cooking vegan/gluten free.
-
Stir continually as it cools!
see 2 more tweaks
RECIPE SUBMITTED BY

Marg (CaymanDesigns)
United States
With the changes to the email notifications and removal of private messaging, I am no longer able to respond to questions about my recipes. Yet another feature change that has made the website less user friendly. It's sad to watch a fantastic site deteriorate over the years. Some of my recipes are on my blog.