Water Bagels (Not Abm)

"This is a resubmission ... the recipe I originally posted was one I found at thefreshloaf.com. It made a wonderful bagel. But the person who posted it said that she found it in Peter Reinhart's amazing "The Bread Baker's Apprentice"; after making my first batch of bagels, I went out and bought the book, looked at the recipe, and made 'em again. The recipe as printed in Reinhardt's book is subtly different, but makes an even better bagel. If you try this and like it, BUY THE BOOK!!! You'll be making bread that's 1,000% better than any you've ever made before ... (I'm not affiliated with Peter Reinhart in any way; I just think his books produce astonishingly great bread.)"


- Ready In:
- 1hr 30mins
- Ingredients:
- 9
- Serves:
-
12
ingredients
-
Sponge
- 4.92 ml instant yeast
- 510.29 g bread flour
- 566.99 g water, at room temperature
-
Dough
- 2.46 ml instant yeast
- 481.94 g bread flour
- 13.55 ml salt (actually, .7 oz. salt, if you're using kosher or sea salt, it'll be more than 2.75 tsp.)
- 9.85 ml malt drink powder (or 1 Tbsp. malt syrup, honey, or brown sugar)
-
Miscellaneous
- 14.79 ml baking soda
- cornmeal
directions
- Prepare Sponge: Stir yeast into flour in large mixing bowl. Add water and stir just until ingredients are blended. Cover bowl with plastic wrap and set aside to rise for two hours, or until doubled.
-
Prepare dough:
- Add additional yeast to the sponge.
- Add three cups flour, malt powder (or substitute), and salt and mix until all ingredients form a ball. I used the paddle attachment on my KA at slow speed. Slowly add remaining flour until it is completely incorporated. Dough will be very stiff -- bagel dough is much stiffer than typical bread dough.
- Change to the dough hook and begin kneading (on a KA, on speed 2). Knead for about 6 minutes (10 if you're kneading by hand). You're done when the dough is stiff and not sticky. If it's still sticky, add a bit more flour; if it seems to dry to you (and rips when you stretch it), add a smidgin of water and knead a bit longer.
- When finished kneading, divide dough into 12 equal portions (or more, if you want smaller bagels -- 12 portions will give you fairly large bagels). Roll into balls and set aside. Put balls of dough on a piece of parchment paper, cover with a damp towel, and let rest for 20 minutes.
- Shape the bagels: Take each ball of dough, punch a hole in the center with a finger or thumb, and rotate the dough so that it's as smooth and even as possible.
- Take a large baking sheet and cover with parchment paper. Lightly spray the paper with oil, then place shaped bagels on parchment paper. Lightly spray the tops of the bagels with oil. Cover with plastic and let rest an other 20-30 minutes.
- Retard the dough: Put bagels in refrigerate overnight. This is an important step, and will contribute to the taste and texture of the bagel. (You can leave the bagels in the fridge for up to 2 days.).
- Boiling and baking: Preheat oven to 500. Sprinkle cornmeal over a large baking sheet. Fill a large stockpot (as wide a pot as you've got, rather than narrow and deep) with water, and add a tablespoonful of baking soda; bring water to a boil.
- When water is boiling, drop 2-3 bagels (as many as will fit comfortably) into the water. Boil for one minute, then flip over and boil on the other side for one minute. If you boil longer than one minute per side, you'll get an even chewier bagel.
- Remove from water and place on baking sheet. Add toppings (see note below) now, while bagels are still slightly moist, so toppings will stay on the bagel.
- Continue this process until all bagels have been boiled and toppings have been added.
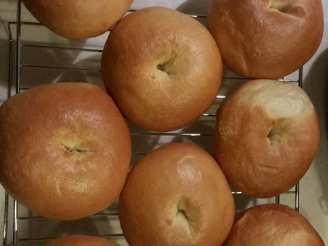
- Put bagels in oven and bake for five minutes. Reduce heat to 450, turn pan, and bake another five minutes (or until bagels begin to brown; may take another minute or three).
- Remove from oven and let cool.
- Note on toppings: You can top these with anything you like: Seeds (sesame, caraway, fennel, anise, poppy, flax); flavorings (salt, onion and/or garlic flakes, or minced and sauteed fresh onion and garlic). Be creative!
Questions & Replies

Got a question?
Share it with the community!
Reviews
Have any thoughts about this recipe?
Share it with the community!
RECIPE SUBMITTED BY

<p>My husband and I live in Cambridge MA with our dog Archie. <br /> <br />I used to be a mediocre cook, with little interest in cooking ... then I joined Weight Watchers in Oct. 2006. I finally realized that to maintain my weight, I needed to find lots of extremely yummy, healthy foods that I enjoyed eating -- and the best way to do that is to learn to cook, and to learn to enjoy cooking. This web site has been 95% responsible for getting me there! <br /> <br />As of Oct. 2007, I am a lifetime member of Weight Watchers, having lost 70 pounds and weighing less than I've ever weighed as an adult. I owe a lot of it to the recipes I've found here! <br /> <br />Re: rating recipes -- I only give out five and four stars, and very occasionally three stars. I don't see any point in giving lower scores; I can't be sure a recipe has turned out badly because of something I've done. Besides, even if I don't like it, the next person might -- and if they see a one-star review, they'll never bother to try it. So I review the ones I've loved, and don't say anything about the ones that didn't work for me. <br /> <br />Hooray for vegetables! <br /> <br />. <br /> <br /> <br /><img src=http://i23.photobucket.com/albums/b399/susied214/projects/200_PACpic.jpg border=0 alt=Photo Sharing and Video Hosting at Photobucket /> <br /> <br /><img src=http://i42.photobucket.com/albums/e347/Saturn6666/KiwiDutch/3chefstag1.jpg alt= /> <br /> <br /><img src=http://i3.photobucket.com/albums/y53/DUCHESS13/Zaar%20World%20Tour%203/ZWT3-Participation.gif alt= /> <br /> <br /><img src=http://i23.photobucket.com/albums/b399/susied214/permanent%20collection/Adopted1smp.jpg border=0 alt=Photo Sharing and Video Hosting at Photobucket /> <br /><img src=http://i23.photobucket.com/albums/b399/susied214/permanent%20collection/smPACp.jpg border=0 alt=Photo Sharing and Video Hosting at Photobucket /> <br /><img src=http://i23.photobucket.com/albums/b399/susied214/permanent%20collection/PAC08Main.jpg border=0 alt=Photobucket /></p>