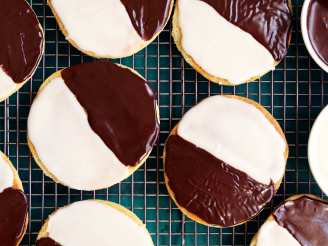
Black and White Cookies


- Ready In:
- 50mins
- Ingredients:
- 13
- Yields:
-
2 dozen large cookies
ingredients
- 1 cup unsalted butter
- 1 3⁄4 cups white sugar
- 4 eggs
- 1 cup milk
- 1⁄2 teaspoon vanilla extract
- 1⁄4 teaspoon lemon extract
- 2 - 2 1⁄4 cups cake flour
- 2 1⁄2 cups all-purpose flour
- 1 teaspoon baking powder
- 1⁄2 teaspoon salt
-
Icing
- 4 cups confectioners' sugar
- 1⁄3 cup boiling water
- 1 ounce bittersweet chocolate, chopped
directions
- Preheat oven to 350.
- Butter 2 baking sheets.
- In a medium bowl, cream together butter and sugar until smooth.
- Beat in eggs one at a time, then stir in the milk, vanilla and, lemon extract.
- Combine cake flour and all-purpose flour, baking powder, and salt; gradually blend into the creamed mixture.
- Drop tablespoons of the dough at least 2 inches apart on prepared sheet.
- Bake until edges begin to brown; checking in 10 minutes.
- Cool completely.
- To make icing: Place confectioners sugar in a large bowl.
- Mix in boiling water one tablespoon at a time until mixture is thick and spreadable.
- Transfer half of the frosting to the top of a double boiler set over simmering water.
- Stir in chocolate.
- Warm mixture, stirring frequently, until chocolate melts.
- Remove from heat.
- With a brush, coat half the cookie with chocolate frosting and the other half with white frosting.
- Set on wax paper until frosting hardens.
Questions & Replies

Got a question?
Share it with the community!
Reviews
-
 lizztwozee, for black and white cookies the instructions should say to flip the cookies over before applying the white and chocolate icings. This way you are frosting the flat side of the cookie and you won't run into problems with the glaze sliding off the dome side of the cookie. You also won't have to go through the effort of roling them out and cutting them out into circles.
 -
 Thank you for this recipe. I added an extra tsp of lemon extract. Also, to get a more traditional B&W cookies presentation, I piped out the dough onto the cookie sheet. They came out just right. I liked the idea about brushing on the frosting, but I would suggest doubling the recipe. It's good to know I'm not alone in my fond memories of the good old black and white cookie! Alaska
 -
I halved this recipe because I was running short on confectioner's sugar. I was disappointed after pulling the first batch out of the oven because the cookies did not melt down like most butter based cookies do. I was left with an entire try of 2 inch high and 3 inch wide cakes with rough surfaces! The next tray I did, I flattened out each dough dropping and shaped it to be more of the large slightly domed smooth surfaced cookie. These came out ok. I think the cookie flavor was terribly bland though (maybe more of both extracts would help??) and the chocolate glaze needed butter in it to maintain the shine. It kept getting dried up and crumbly when I was working with it, even though it was over heat the entire time. Don't think I'll bother with these again. They're better store bought!!
-
 I did not like this recipe at all. The cookies tasted like bicuits with icing. I even double checked to make sure I followed the recipe.
 -
Not having had a B&W cookie in ages, it would have been helpful to know to brush the icings on the flat side. Only after I saw the picture did it hit me! I agree about the icings. I had to add more chocolate and adding more powdered sugar was not a fix. The next time, I'm adding milk instead of boiling water to get a harder and higher gloss finish. The cookie alone was great.
see 3 more reviews
Tweaks
-
Not having had a B&W cookie in ages, it would have been helpful to know to brush the icings on the flat side. Only after I saw the picture did it hit me! I agree about the icings. I had to add more chocolate and adding more powdered sugar was not a fix. The next time, I'm adding milk instead of boiling water to get a harder and higher gloss finish. The cookie alone was great.