Community Pick
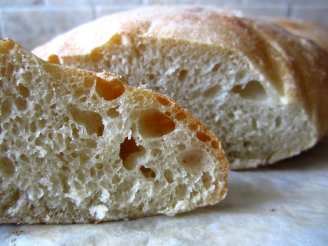
Ciabatta Bread

"Found in response to a request for a bread machine recipe for Ciabatta Bread. I love this stuff. It is one of the best breads I make!"
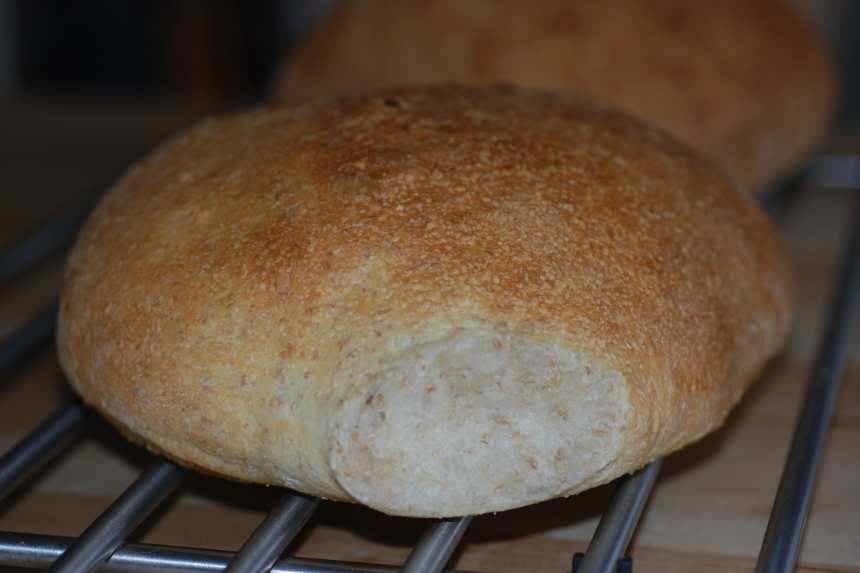
photo by Katzen


- Ready In:
- 2hrs 30mins
- Ingredients:
- 6
- Yields:
-
2 loaves
- Serves:
- 12
ingredients
- 1 1⁄2 cups water
- 1 1⁄2 teaspoons salt
- 1 teaspoon white sugar
- 1 tablespoon olive oil
- 3 1⁄4 cups bread flour
- 1 1⁄2 teaspoons bread machine yeast
directions
- Place ingredients into the pan of the bread machine in the order suggested by the manufacturer.
- Select the Dough cycle, and Start.
- Dough will be quite sticky and wet once cycle is completed, resist the temptation to add more flour.
- Place dough on a lightly floured board, cover with a large bowl, and let rest for 15 minutes.
- Lightly flour or use parchment lined baking sheets.
- Divide into 2 pieces, and form each into a 3x14 inch oval.
- http://italian-baking.suite101.com/article.cfm/ciabatta_bread_bread_machine_.
- Place loaves on prepared sheets, dimple surface, and lightly flour.
- Cover, and let rise in a draft free place for approximately 45 minutes.
- Preheat oven to 425°F.
- Dimple dough for a second time, and then place loaves in the oven, positioned on the middle rack.
- Bake for 25 to 30 minutes.
- During baking, spritz loaves with water every 5 to 10 minutes for a crispier crust.
Questions & Replies

-
 When making the ciabatta recipe can I allow the dough to rise in the bread maker. Thanks
Reviews
-
 I have been enjoying this bread for several years now and wanted to comment in response to some folks who have had trouble with the stickiness. It IS sticky, and I usually don't have time to be bothered with shaping sticky dough into loaves, so my solution has been to pour the dough from the bread machine pan directly into a lightly greased 9x11 pyrex. Then (with oiled hands) I push and pull the bread to spread it evenly across the pan, trying to be as ginger as possible so as not to lose the lovely air pockets. Then I cover it with a tea towel and slide it into a warm oven to rise (a minute at 200 degrees usually does the trick). Then, pull it out to preheat and bake as usual (maybe a bit longer than normal due to the thickness of the "loaf"). I realize that the finished product isn't nearly so traditional, but it has been a simple, fool-proof solution for me, and makes a tasty pan of bread! Thanks for the great recipe!!!
 -
 I wanted to clear some things up on this bread for those who have never made it before. The batter will be VERY wet, it is tricky to handle, for it to bake the way Ciabatta should do not treat it like other breads, you need the wet dough, do not add flour to it, also avoid overhandling the dough, after its rise you need to handle it with a very light touch (like a baby as they say in Italy) so that those precious air bubbles we worked so hard to get dont break. Ok, so you handle it carefully, with well floured hands you pull and stretch the dough into a rough rectangular shape, dust the loaf and your hands with flour again, then neaten and plumpen the dough with your fingers tucking the sides under to create a fairly tidy appearance. I will post a pic (making this again tomorrow) of the dough in its uncookes phase so everyone can see how it looks. If you have never made this before it can be unnerving LOL. So, wrinkled, messy, lumpy flat looking dough that is sticky and unmanageable is normal, dont worry! ;p
 -
easy and delicious. made just as posted except that i separated the dough into 6 steak roll size portions and used them - fresh and hot from the oven - for philly cheesesteak sandwiches. because the dough was split into 6 smaller portions, i only had to let it rise 20 mins the second time. they turned out perfect!! my hubby said twice that he thought the bread was awesome! a keeper recipe, for sure. thanks for posting.
-
 This was the very first bread I made in my new breadmaker and it came out perfectly. I had dough not batter, but I did use real bread flour as the recipe recommends. I used some of the other rater's hints: Left it in the machine with it unplugged for the first rest period, shaped it into dough right onto my baking stone, and sprayed the plastic wrap with non-stick spray. The results were fantastic! The only thing I didn't do was spray the crust every 5 minutes. Based on the finished product, there was really no need!
 -
 Great recipe! Instead of placing the dough on a lightly floured board in step 3, I have been letting it rest in the machine. I just unplug it after 10 minutes. Then just pour it into the shape of the loaf. It seems to work fine, and less to clean up!
see 51 more reviews
Tweaks
-
 Lovely bread - I made it exactly as described... well, I did replace one cup of white bread flour with wheat bread flour. I definately think spritzing the bread while in the oven is important, and I also had a cast iron pan in the oven with water in it, too. Thanks for the easy recipe - I'm using it as a base for one of my ZWT recipes! PS - definately read Eadaein's review on how to handle the dough - I'm very glad I did!
RECIPE SUBMITTED BY

TishT
Las Vegas, Nevada
I live in Las Vegas. I was lucky enough to run into Recipezaar around Nov. 2000 and got hooked quickly. I am a cookbook collector and have been collecting recipes for as long as I can remember. My DH had to build in shelves for all my cookbooks! I like to dabble with OAMC and for a few years hosted the Budget/OAMC forum with some great people over there. Even though I don't work in the forum any longer I've set up a lot of cookbooks for the purpose of OAMC and stretching food that might be helpful. Please feel free to check them out! I go on food jags and cooking jags! Please come say hi to me and chat on facebook. I currently host a blog for saving money through finding deals and coupons if you are interested. Most of the time I try to cook and have a good dinner on the table but I'll be honest enough to say there is still fast food occasionally in the budget! I have had such wonderful support here whenever I need it. Thank you all for being here! Just a quick note on how I rate recipes:
? 5 stars - This recipe is perfect. (My DH is truly a critic and doesn't give 5's unless it's amazing) I would recommend it to others and would definitely make again.
? 4 stars - This recipe was good but I would change something in it next time.
? 3 stars - This is a recipe I would not make again but it was OK
? 2 stars - This recipe I would not make again and we didn't like it at all
? 1 star - This recipes did not work out/taste was unappealing and wouldn't make again