Easter Egg Hunt Cake

"Celebrate the spring with this playful Easter egg cake with a sweet hidden surprise!"


- Ready In:
- 6hrs
- Ingredients:
- 10
- Yields:
-
1 cake
- Serves:
- 12
ingredients
- 12 large egg whites, at room temperature
- 4 large whole eggs, at room temperature
- 4 cups whole milk, at room temperature divided
- 6 tablespoons vanilla
- 12 cups cake flour, sifted
- 6 cups granulated sugar
- 5 tablespoons and 1 tsp baking powder
- 4 teaspoons fine salt
- 3 cups unsalted butter, at room temperature
- 14 cups Milkmoon Meringue Buttercream for frosting
directions
-
Special Equipment Needed:
- Gel food coloring (I use Americolor gels in the Electric color line); set of nine round cookie cutters in graduated sizes; piping bags; Ateco piping tips #48 (ideally 2-4 of these) and #199; a silicone egg mold.
-
Bake Your Cake:
- Preheat your oven to 350°C Prepare eight 6-inch-round, 3-inch-deep (6”x3”) cake pans by greasing with shortening, placing a baking paper round on the base, greasing again, and flouring. If you only have four that’s fine, you can do your baking in two rounds; just divide your recipe listed above in two and make two rounds of batter.
- In a medium-size bowl, combine your egg whites, whole eggs, 1/2 cup of your milk, and vanilla and whisk to combine. Set aside.
- In the bowl of a stand mixer fitted with the paddle attachment, combine your cake flour, sugar, optional whole milk powder, baking powder, and salt and mix on low speed for a few minutes until combined.
- Add in your butter and keep mixing to begin moistening your dry ingredients for about 20 seconds. Stream in your remaining 1 1/2 cups milk, half a cup at a time, continuing to beat on the lowest speed. Raise the speed to medium and continue to beat for about 1 minute.
- Scrape your bowl, and then return the batter to low speed. Add your egg mixture in three batches, allowing each to incorporate fully before adding the next. Scrape again and mix briefly.
- Divide your cake batter into four portions, with two portions being slightly larger and two slightly smaller. Color the larger portions light blue and pink, and the smaller portions a deeper blue and yellow. I use Americolor Electric Blue, Electric Pink, and Electric Yellow in small amounts to create soft but vivid pastel colors.
- Split your light blue batter between half of your pans, alternating large spoonfulls of it with spoonfulls of your dark blue batter. Run a toothpick or a skewer through the batter, swirling gently. Repeat with the remaining cake pans using your pink and yellow batter.
- Bake your cakes for roughly 30-35 minutes, but keep an eye on them starting at minute 25. You’ll know they’re baked through when you press down in the center of each cake and it springs back. You can also insert a cake tester, and it should come out clean with at most a few moist crumbs clinging to it.
- Remove your cakes from the oven and allow to come to room temperature on a rack. Then, I like to wrap them up in plastic and put them in the fridge for at least half an hour, preferably overnight before I remove them from the pans. The cakes should be cold all the way through before attempting to trim them!
-
Prepare Your Layers:
- Level and torte each of the 8 small cakes into ½ inch layers.
-
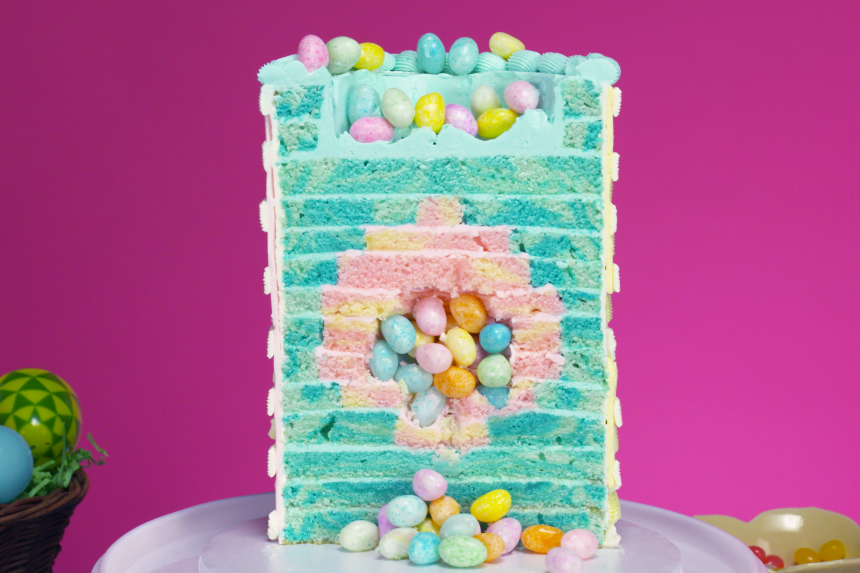
The best way I found to create the embedded egg shape within the cake was to label my round cutters with numbers 1-9 (1 being the largest cutter, 9 the smallest) to keep organized. The shape is created by punching holes in the blue cake and filling the holes by inserting equally sized rounds of pink cake, some of which get a further hole cut in them to create the hollow we’re filling with jelly beans. I created the layers of the cake as follows:
- Layers 1-3: Just regular blue cake layers.
- 4th Layer: Blue cake layer with cutter #7 used to create the pink insert.
- 5th Layer: Blue cake layer with cutter #3 used to create the pink insert, then the pink insert hollowed with cutter #8.
- 6th Layer: Blue cake layer with cutter #1 used to create the pink insert, then the pink insert hollowed with cutter #5.
- 7th Layer: Identical to layer six.
- 8th Layer: Blue cake layer with cutter #1 used to create the pink insert, then the pink insert hollowed with cutter #7.
- 9th Layer: Blue cake layer with cutter #3 used to create the pink insert.
- 10th Layer: Blue cake layer with cutter #5 used to create the pink insert.
- 11th Layer: Blue cake layer with cutter #9 used to create the pink insert.
- 12th Layer: Regular blue cake layer.
- 13th-14th Layer: Blue cake layer hollowed with the #1 cutter.
-
Stack Your Cake:
- Layer your cake in the order listed above, starting with Layers 1-3 to form the base and then working your way through to the 14th. As a rule of thumb, use blue buttercream to cover blue cake between layers, and pink buttercream to cover pink cake. You can be more precise if you use piping bags to lay down your buttercream.
- Once you get to the final layer where the pink has been hollowed out, layer 8, fill the cavity you’ve created in the cake with jelly beans, pushing them down lightly to make sure you can fit in as many as possible. Continue with your layering until you reach the top.
- Pipe a thin wall of blue buttercream along the inside of the lip of cake you’ve formed at the very top of the cake with your two hollow blue layers, just to give them a little extra stability. Smooth it out and place your cake in the refrigerator to firm up.
-
Ice Your Cake:
- Once your cake has had 15-20 minutes to chill, trim the caramelization off the sides. Apply a crumb coat of white buttercream and return to the refrigerator to allow it to firm up.
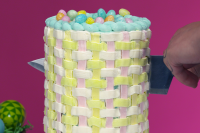
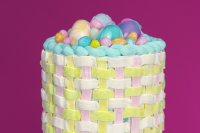
- Fit four pastry bags with couplers and fit two of those with Ateco #48 small basketweave tips (if you have four #48s, go ahead and fix them to all four bags). Fill the bags with pink, white, green, and yellow buttercream.
- Pipe your basketweave around the outside of the cake by creating vertical stripes alternating between pink and yellow all the way around the cake. Use your green and white to create alternating bands of buttercream “woven” into the stripes to create your basketweave look.
- Cap the basketweave with a blue piped rope border using a small open star tip of your choosing—I used an Ateco #199. Refrigerate the cake.
-
Make Chocolate Eggs:
- Melt your candy melts in the microwave, stirring frequently until no lumps of chocolate are left. Using a paintbrush, paint thin strokes of chocolate into your silicon egg mold’s egg-shaped cavities, vertically or horizontally, then freeze for at least 5 minutes to allow to firm up. Fill each cavity with a different color of chocolate all the way, or add just a dollop and paint that color in to create a 1/8th inch shell. Freeze again until firm, and if you’ve created hollow shells, fill these with jelly beans and dollop chocolate over the top to seal the candy inches Freeze until ready to use.
-
Finishing Touches:
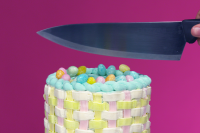
- Pop your chocolate eggs out of their molds by pushing firmly from the bottom until they come free.
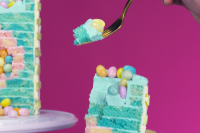
- Pipe dollops of blue buttercream into the depression at the top of the cake and place 4-5 of your chocolate eggs inside, then sprinkle with more jelly beans to create a fun basket of candy.
- When you’re ready to cut the cake, remove your eggs first, then cut straight down halfway through the cake and remove the front half to reveal your hidden candy egg inside!
Questions & Replies

Got a question?
Share it with the community!
Reviews
Have any thoughts about this recipe?
Share it with the community!
RECIPE SUBMITTED BY

Milkmoon Kitchen
New York City, New York
I dream in buttercream =)
IG @milkmoonkitchen


