Isomalt Jewels

"A sneaky way to make candy glass jewels."
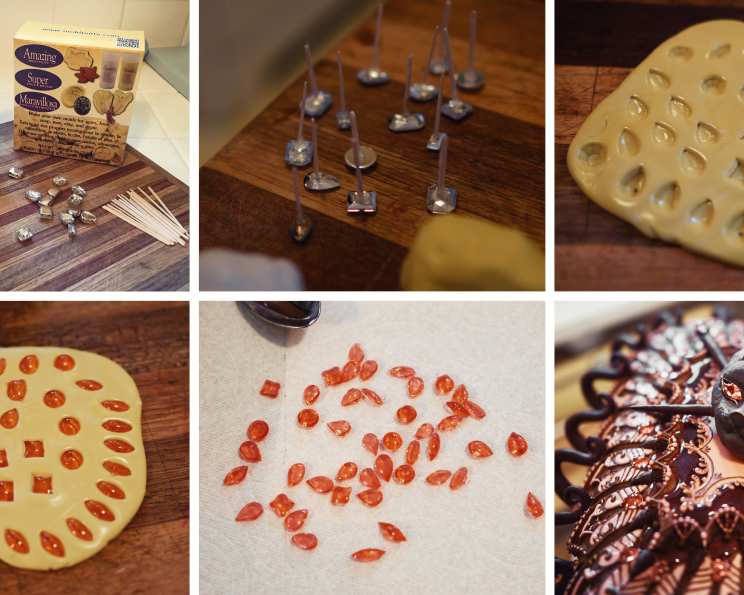
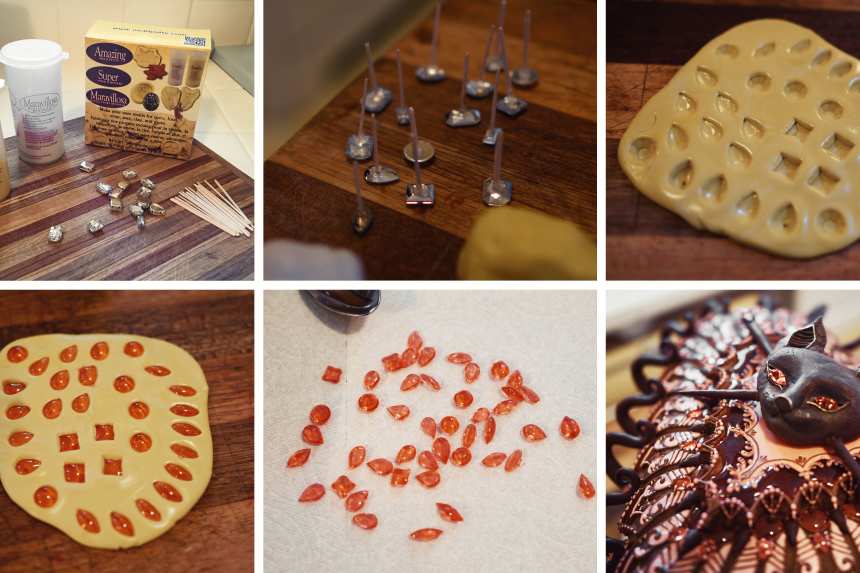
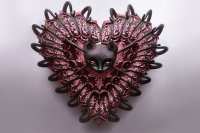
photo by ChristineMcConnell


- Ready In:
- 3hrs 20mins
- Ingredients:
- 2
- Yields:
-
60 jewels
ingredients
- isomalt sugar substitute, or use Hocus Pocus Cottage Cake for homemade Candy Glass recipe
- gel food coloring
directions
-
Additional Tools Needed:
- Plastic or glass jewels you want to replicate.
- Food-safe Moldable putty.
- toothpicks.
- hot glue gun.
-
HOW TO:
- I recently came upon the wonder that is isomalt! I've been making my own candy glass for years, and while I'm glad I have that experience under my belt, isomalt is worlds easier to work with and nowhere near as finicky! It's available to order online or pick up at your local cake supply store. If you're on a budget or don't have time to pick up isomalt, please see my candy glass recipe (in the ingredient section under Hocus Pocus Cottage Cake) for a homemade substitute!
- I will say the same danger applies here as candy glass and you should use extreme caution when working with either. This liquid is EXTREMELY hot! I made the mistake of working in bare feet, and a single drop caused a really unpleasant burn! So long sleeves, thick pants, eye protection, shoes, and gloves are what I recommend! You may look like a lunatic, but who cares!?.
-
Instructions:
- Break toothpicks in half and using your hot glue gun adhere to the backs of your jewels to use as a handle when pressing the shapes into your mold.
- Follow molding putty directions by mixing equal parts of the two putty's and rolling out with a rolling pin. Press jewels into the putty and remove immediately to create molds. Allow to set (About 30 minutes or so).
- Put 2 cups isomalt crystals into a pot and melt at medium heat, stirring occasionally until all crystals are dissolved, and the mixture is bubbling. Remove from heat and add coloring. Wait till the mixture is clear before using.
- Once ready, using a small metal spoon or measure, pour tiny amounts into your jewel molds one at a time. Use a toothpick or needle to sharpen or perfect edges.
- Allow to cool. Remove from molds and apply directly to your cookie! I adhered mine by resting the jewels in the places I wanted and piped royal icing as brackets to fasten. Once the royal icing had dried completely, I used gold luster dust to paint the brackets gold giving them a fairly realistic jewel look.
Questions & Replies

Got a question?
Share it with the community!
Reviews
Have any thoughts about this recipe?
Share it with the community!
RECIPE SUBMITTED BY

ChristineMcConnell
United States
Artist, photographer, baker and author of Deceptive Desserts


