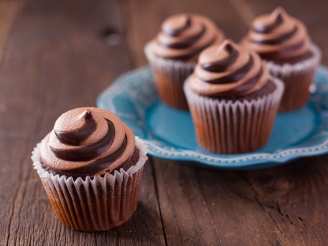
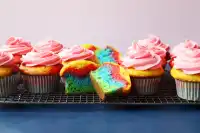
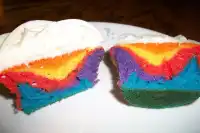
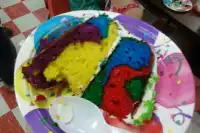
Rainbow Bright Cupcakes

"From the blog Picky Palate (http://picky-palate.com). These are beautiful and yummy."
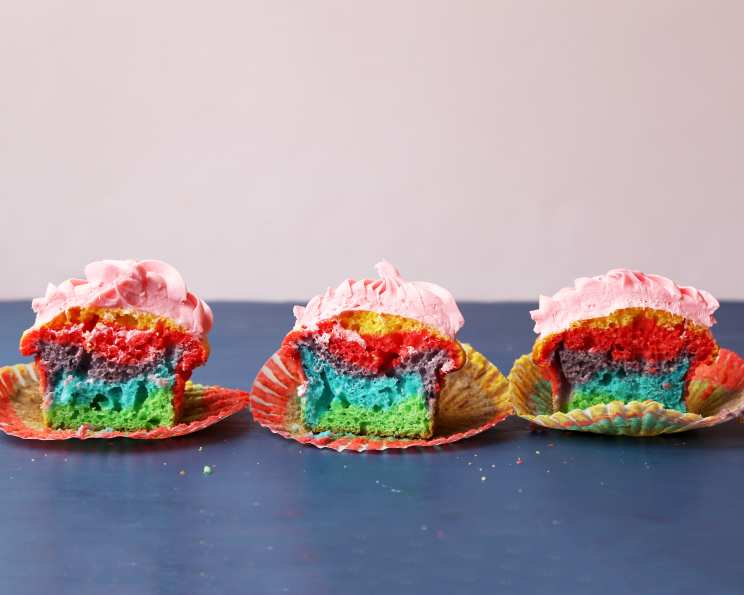
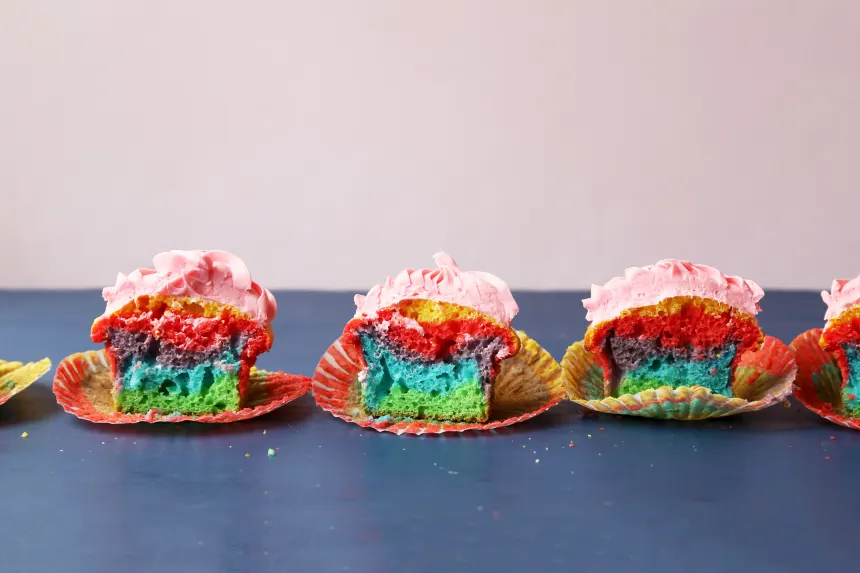
photo by Jonathan Melendez


- Ready In:
- 40mins
- Ingredients:
- 8
- Yields:
-
24 cupcakes
- Serves:
- 24
ingredients
- 1 (18 ounce) box yellow cake mix
- 4 eggs
- 1⁄2 cup vegetable oil
- 1⁄2 cup water
- 8 ounces sour cream
- 1 small vanilla instant pudding mix
- food coloring (Red, Blue, Yellow, Green and Purple)
- vanilla or cream cheese frosting, of choice
directions
- Preheat oven to 350 degrees F. In a stand or electric mixer, beat the cake mix, eggs, oil, water, sour cream and pudding on medium until well combined. Batter will be nice and thick.
- Divide batter evenly between 5 white or glass bowls. Drop 5 different colors of food coloring into each cake batter bowl until you reach your desired colors. Stir well.
- Spoon each color into paper lined cupcake tins until all are filled. Bake for 22-25 minutes or until cooked through. Remove and let cool completely. Frost with frosting of choice.
Questions & Replies

Got a question?
Share it with the community!
Reviews
-
 I found that after adding the food coloring, put each colored batter into separate zip lock baggies, remove the air then cut a tip off of one corner of each bag, then begin filling your cupcake liners. This is a great way to have your kids help you, too. The same can be done with icing.
 -
 these are AWESOME, i made a cake with them for my little cuz 6th b-day, they alllll loved them and parents kept asking me how to make it... not only are they cool but the tasted AMAZING with the sour cream it made it extra moist, and i also used french vanilla cake mix rather then white. VERY YUMMY i recommed this
 -
 Had so much fun making these for DGSs while they are visiting. I used a white cake mix as that's what I had and tried for Spring colors using gel food coloring. They turned out so bright and pretty. I saved time by using a canned cream cheese frosting topping with sprinkles. They were soooo excited to bite into them and see all the colors. The youngest has even asked for a cake made like this for his b-day this summer.
 -
 The kids are loving these. Easy to make turned out tasty, too. Watch the bake time or they brown on the top & lose some of the effect. I used gel coloring.
 -
 Super fun recipe...and yummy, too! I used white cake mix once and funfetti cake mix another time. Both turned out spectacular. I mixed blue and pink food coloring to make purple, and used green, yellow, blue and pink for the other colors. Totally worth the extra dirty dishes. We will be making these again!
see 4 more reviews
RECIPE SUBMITTED BY

<p><strong><span>I'm the host of Bargain Basement tag game in the cooking game forum. You're welcome to play anytime. You'll be surprised to find great recipes that were never reviewed. <br /></span></strong></p>
<p>~~~~~~~~~~~~~~~~~~~~~~~~~~</p>
<p><strong><span>I want to say a big thank you to everyone who tries my recipes and post photos. I don't always have the time to say thanks to each of you but be sure it's so appreciated :)</span></strong></p>
<p>~~~~~~~~~~~~~~~~~~~~~~~~~~</p>
<p> </p>
<p><img src=http://i195.photobucket.com/albums/z205/jubespage/zwt6%20banners%20and%20photos/captain.jpg alt=width=150 height=200 /></p>
<p><br /><img src=http://i27.photobucket.com/albums/c175/emmyduckie/zwt/ZwizzleBadge.jpg alt=width=200 height=300 /><br /> <br /><a title=banner3 href=http://www.flickr.com/photos/26630178@N05/3510953178></a><img src=http://farm4.static.flickr.com/3387/3510953178_b35b3086a8.jpg alt=banner3 width=500 height=250 /> <br /><img src=http://i23.photobucket.com/albums/b399/susied214/permanent%20collection/captain.jpg border=0 alt=Photobucket /> <br /><img src=http://i23.photobucket.com/albums/b399/susied214/permanent%20collection/PAC08Main.jpg border=0 alt=Photobucket /> <br /><img src=http://i23.photobucket.com/albums/b399/susied214/permanent%20collection/adoptedspring08.jpg border=0 alt=Photobucket /> By Brooke The Cook in WI <br /><img src=http://i147.photobucket.com/albums/r317/j_welcome/pics2/food/PRMRcopy.jpg alt=/ /> <br /><a href=http://www.recipezaar.com/bb/viewtopic.zsp?p=3510511#3510511> <br /> <br /><img src=http://i23.photobucket.com/albums/b399/susied214/projects/200_PACpic.jpg border=0 alt=Photo /> <br /> <br /></a><a title=Photo href=http://www.flickr.com/photos/boomette1/514183676></a><img src=http://farm1.static.flickr.com/252/514183676_f79b486466_m.jpg alt=good width=240 height=137 /> <br /><img src=http://i23.photobucket.com/albums/b399/susied214/permanent%20collection/Adopted1smp.jpg border=0 alt=Photo /> <br /><img src=http://i23.photobucket.com/albums/b399/susied214/permanent%20collection/smPACp.jpg border=0 alt=Photo /></p>
<p><img src=http://img.photobucket.com/albums/v726/annacia/Permanent%20Banners/ZTAA-sm.jpg border=0 alt=Photobucket /></p>
<p><img src=http://i21.photobucket.com/albums/b280/carolinamoon21/Ingredients/BANNERS/Pets-STKR.jpg alt=width=200 height=200 /></p>