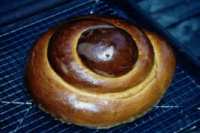
Spiral Challah

"One of my favorite challah recipes from The New Jewish Holiday Cookbook: An International Collection of Recipes and Customs. Intricate instructions insure that you won't go wrong. Read the whole recipe before you even attempt to start!"
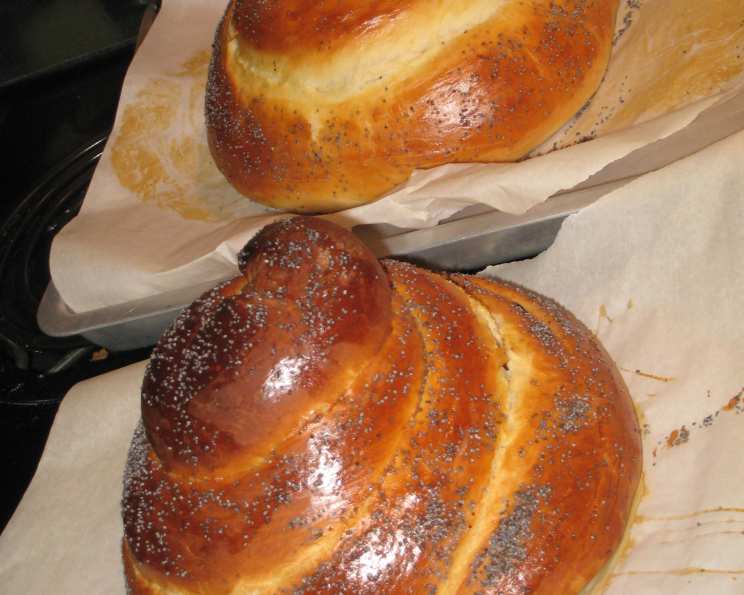
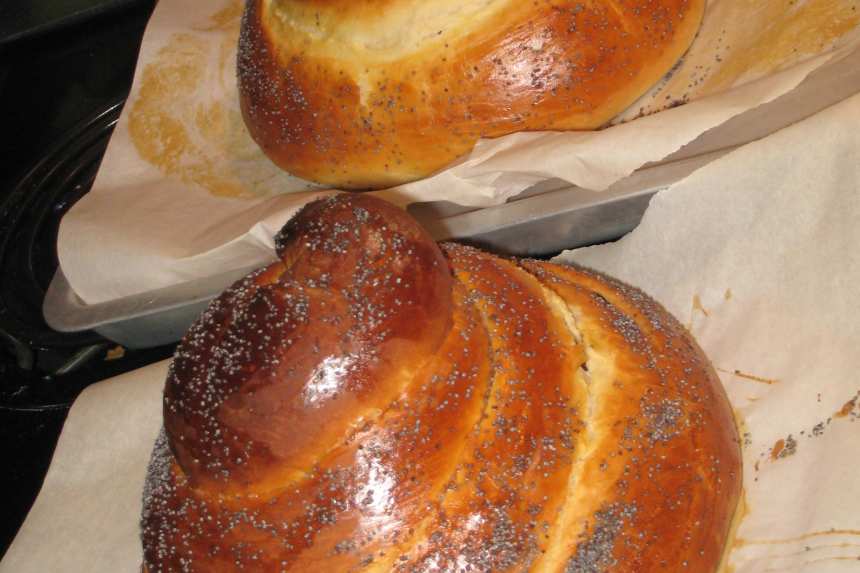
photo by Georgiapea


- Ready In:
- 1hr 35mins
- Ingredients:
- 12
- Yields:
-
2 spiral challahs
ingredients
- 6 1⁄2 - 7 1⁄2 cups white bread flour or 6 1/2-7 1/2 cups gluten flour ("or" a mixture)
- 2 tablespoons bread machine quick-acting active dry yeast
- 1⁄3 cup sugar
- 2 teaspoons salt
- 1 tablespoon anise seed
- 1 tablespoon sesame seeds
- 4 large eggs or 1 cup egg substitute, divided
- 1⁄4 cup canola oil or 1/4 cup light olive oil
- 1⁄4 cup fruity dark olive oil or 1/4 cup canola oil
- 1⁄3 cup honey
- 1 1⁄2 cups hot tap water (, 120 to 130 degrees, no hotter than this or it may kill the yeast)
- 1⁄2 - 1 cup light raisins or 1/2-1 cup dark raisin
directions
- Mixer Method-----------.
- In the large (about 5-quart) bowl of a heavy-duty electric mixer that has a dough-kneading hook, put about 5 cups of the bread flour, yeast, sugar, salt, and seeds.
- Mix the dry ingredients by holding the hook in your hand and using it to stir (this saves washing another utensil).
- Add 3 eggs (or 3/4 cup egg substitute) and the oil and honey (use an oiled measuring cup for the honey and it will slide right out) to the flour mixture, and stir in with the hook.
- It is not necessary to mix well.
- Finally, add the hot water and stir in.
- Set the bowl into the mixer, and attach the dough hook.
- Turn the mixer to kneading speed.
- If the dough is very wet and soft, add about ½ cup flour or enough so that the dough begins to gather around the hook.
- As the dough kneads, lightly sprinkle just enough flour around the inside surface of the bowl so that the dough stays on the hook and does not come down off the hook into the bottom of the bowl.
- You will probably need to use more flour in the beginning, and less as the dough kneads.
- Let the dough knead for about 5 to 10 minutes, or until it is very smooth.
- When it is almost done kneading, it should need very little or no more flour and should almost clean the inner surface of the bowl.
- Note: If the dough rides over the top of the hook, scrape it down and add more flour.
- This may happen if the bowl is too small for the recipe.
- Consider reducing the recipe by one-third in the future.
- Remove the dough hook from the dough, but leave the dough in the mixer bowl.
- Cover the bowl with a plastic lid or a piece of plastic wrap so the dough does not dry out, and let it rest for 20 minutes.
- It will probably not rise very much.
- Hand Method-----------.
- In a large bowl, combine 4 cups of the bread flour, yeast, sugar, and salt, and mix to combine using a sturdy mixing spoon (such as a wooden one).
- Add 3 eggs (or 3/4 cup egg substitute) and the oil and honey (use an oiled measuring cup for the honey and it will slide right out) to the flour mixture, and stir in lightly.
- Finally, add the hot water, and stir it in very well.
- Note: A strong electric stand mixer with standard beaters may be used for mixing to this point, but the rest must be done by hand if there is no dough hook.
- Stir in about 1 1/2 cups more flour, and mix to make a soft, sticky dough.
- Let the dough rest, covered, for about 5 minutes to allow the flour to absorb some moisture (so that less flour will be required during kneading).
- Turn out the dough onto a well-floured surface (board, countertop, etc.), and knead, adding small sprinkles of flour as needed to keep the dough from sticking to your hands or the surface.
- Try to keep your hands free of sticky dough, as this will make even more dough stick.
- To “clean” your hands, sprinkle them lightly with flour and rub them together.
- Knead for about 10 to 15 minutes, or until the dough is very smooth and silky feeling, and is no longer sticky.
- To keep the dough from drying out, put it into an ungreased covered bowl, or turn a bowl over the dough on the kneading surface, or cover the dough with plastic.
- Let it rest for 20 minutes.
- It will probably not rise very much.
- Both Methods-----------.
- While the dough is resting, prepare the baking sheets.
- Use large, heavy, flat, shiny aluminum baking sheets (cookie sheets) and coat them with nonstick cooking spray or top them with special parchment paper used for baking.
- To easily remove the dough from a bowl, sprinkle a little extra flour over the dough, and use a spatula to push the flour all the way down the sides of the bowl while completely loosening the dough at the same time.
- Turn out the dough onto a lightly floured board, and press it gently into a rough mound of even thickness.
- Cut the dough in half.
- Shape each half into a spiral loaf adding raisins, if desired, as directed below.
- Be careful not to stretch or tear the dough as you shape it, or the surface of the loaf may develop holes when it rises and bakes.
- For a spiral-----------.
- With very lightly floured hands, gently squeeze the dough into a snake of even thickness that is about 36 inches long.
- Place the snake horizontally on a lightly floured countertop or other surface.
- Use your fingertips to press the snake very flat, making a rectangle that is about 4 inches wide and 36 inches long.
- If using raisins, press about ½ cup of them into the top of the dough, arranging them so that none are touching and the whole surface is covered.
- Beginning with the long edge closest to you, tightly roll up the dough like a very long jelly roll, forming a neat log (and enclosing the raisins, if they are used).
- Pinch the remaining long edge of the dough tightly against the log so that it cannot unroll, and pinch both ends of the log closed.
- Gently roll the log on a floured surface to smooth down the pinched long edge and to coat the log completely with flour.
- Brush off any excess flour.
- With your hand, raise one end of the log so it points upward.
- Fold it over about 2 inches so the rough end of the log will not show at the top of the loaf, but still keep this end slightly raised so it will be the highest part of the loaf.
- Use your other hand to neatly wind the rest of the log around the bent end in a spiral fashion, keeping the seam side down.
- Tuck the final end neatly under the bottom of the round loaf, and pinch it against the loaf so that the spiral cannot unravel.
- Carefully transfer the loaf to the center of a prepared baking sheet.
- Repeat with the second half of the dough to form another round loaf.
- These are large challot, and each must be placed on its own baking sheet.
- As soon as the loaves are shaped, brush them heavily with egg glaze.
- For the glaze, beat the remaining egg with a teaspoon of water until the egg is barely frothy.
- Or use the remaining ¼ cup egg substitute directly from the carton.
- Let the loaves rise at room temperature until they are almost, but not quite double.
- Put each loaf on the middle rack of a cold oven.
- Raise the heat to 350 degrees.
- Bake for 45 to 50 minutes, or until the loaves sound hollow when tapped on the bottom.
- Immediately remove the loaves from the baking sheets, and cool them completely on wire racks.
Questions & Replies

Got a question?
Share it with the community!
Reviews
-
 Hey Mirj - I'm sorry I can't give you stars because I didn't actually try your recipe - but I used your rolling method and it came out great. Thank you! (P.S. I just posted pictures but the Zaar folks kind of skewed them - they don't look like oozy spirals - they are really beautiful, perky spirals!)
RECIPE SUBMITTED BY

Mirj2338
Givat Ze'ev, 0
<p><strong><span style=color: #ff0000;>Come and visit me on my blog: </span></strong></p>
<p><a href=http://www.miriyummy.wordpress.com><strong><span style=color: #ff0000;>www.miriyummy.wordpress.com</span></strong></a></p>
<p> </p>
<p>October 2011: It's been 10 years since I came into Zaar one day at the recommendation of someone on another website. If you ask my husband (or my coworkers), I haven't logged out since! <br /><br /><a href=http://www.TickerFactory.com/><br /><img src=http://tickers.TickerFactory.com/ezt/d/4;15;0/st/20011021/e/I Joined Zaar%21/dt/6/k/f656/event.png border=0 alt= /></a> <br /><br />So what's happened in the ten years since I became addicted to Zaar? Well, I've been happily married, happily divorced, and happily married once again. (Wanna see wedding pictures? Click <a href=http://community.webshots.com/user/mirjamdorn>here</a>.) <br /><br /><a href=http://smg.photobucket.com/albums/v240/mirj/?action=view?t=chuppah2.jpg target=_blank><img src=http://img.photobucket.com/albums/v240/mirj/chuppah2.jpg border=0 alt=Photobucket /></a> <br /><br />Originally from the Bronx, I've been living in Israel since 1983. I'm married to a brilliant man with the most yummy British accent (this is the part where he rolls his eyes and says, Yeah, yeah, yeah). Let's call him Sushiman, even though he hates that name. <a href=http://www.recipezaar.com/member/52282>Chia</a> gave him that nickname when I was trying to create a dinner to show off my culinary talents. I posted here on Zaar with questions about the menu and since sushi was the main focus of the meal, he became Sushiman. That dinner was just the first of what I hope will become a lifetime of meals together. <br /><br />This is a picture of us taken in September 2005 in Kew Gardens in London. It my favorite picture of the two of us. <br /><br /><a href=http://photobucket.com/ target=_blank><img src=http://img.photobucket.com/albums/v240/mirj/Kew.jpg border=0 alt=Photobucket - Video and Image Hosting /></a> <br /><br />This comes in as a close second, taken March 2009: <br /><br /><a href=http://smg.photobucket.com/albums/v240/mirj/?action=view?t=Wedding6.jpg target=_blank><img src=http://img.photobucket.com/albums/v240/mirj/Wedding6.jpg border=0 alt=Photobucket /></a> <br /><br />I have 4 of the most gorgeous daughters in the known universe (tfu, tfu, tfu, that's me spitting three times to ward off the Evil Eye). Sushiman has 4 kids of his own, so together that makes us a family of ten, together with my dog and my step-dog (sadly, since I first wrote this my step-dog, Honey, crossed the Rainbow Bridge). We're the Brady Bunch on speed. Not all eight live with us, but everyone is in and out all of the time, so we're thinking about replacing our front door with one of those revolving thingies.</p>
<p>If you need help figuring out the whole complicated mess, you can check out <a title=Miriyummy -- A Guide to the Perplexed href=http://miriyummy.wordpress.com/about/ target=_blank>Miriyummy, A Guide to the Perplexed</a>.</p>
<p>Here are my four beauties -- from left to right: Adiya, Sara, Nomi and Tehila <br /><br /><a href=http://smg.photobucket.com/albums/v240/mirj/?action=view?t=111.jpg target=_blank><img src=http://img.photobucket.com/albums/v240/mirj/111.jpg border=0 alt=Photobucket /></a> <br /><br />On March 18, 2009, my oldest, Sara, got married to Ariel. The wedding was a clash of cultures and traditions, and we had a blast! <br /><br /><a href=http://smg.photobucket.com/albums/v240/mirj/?action=view?t=171.jpg target=_blank><img src=http://img.photobucket.com/albums/v240/mirj/171.jpg border=0 alt=Photobucket /></a> <br /><br />Over 500 people attended our little party... <br /><br /><a href=http://smg.photobucket.com/albums/v240/mirj/?action=view?t=237.jpg target=_blank><img src=http://img.photobucket.com/albums/v240/mirj/237.jpg border=0 alt=Photobucket /></a> <br /><br />... and Ariel was welcomed into our family in style! <br /><br /><a href=http://smg.photobucket.com/albums/v240/mirj/?action=view?t=225.jpg target=_blank><img src=http://img.photobucket.com/albums/v240/mirj/225.jpg border=0 alt=Photobucket /></a> <br /><br />If you want to see the photo album from Sara and Ariel's wedding, just go <a href=http://family.webshots.com/album/571020179JBDlvf?vhost=family&vhost=family&action=refreshPhotos&albumID=571020179&security=JBDlvf>here</a>. <br /><br />We're just one big happy family, most of the time, really! <br /><br /><a href=http://smg.photobucket.com/albums/v240/mirj/?action=view?t=098.jpg target=_blank><img src=http://img.photobucket.com/albums/v240/mirj/098.jpg border=0 alt=Photobucket /></a> <br /><br />Here on Recipezaar I am the host of the <a href=http://www.recipezaar.com/bb/viewforum.zsp?f=29>Kosher & Jewish Cooking forum</a>. Come on in, and let the Jewish Mothers of Zaar feed you senseless! <br /><br />I hope you enjoy my recipes. I have only posted recipes of food that I am willing to eat myself. Therefore, you won't find anything unkosher in my recipes. You won't find any stinky bleu cheese or goat's cheese either. You will find a lot of comfort food, I believe that comfort food is very important. <br /><br />Gay and Troy are always thanking us for making Recipezaar such a great place. I firmly believe that it's Gay and Troy themselves that deserve a multitude of thanks, from us! And I hope I live up to their expectations! <br /><br /><strong>Miscellaneous Stuff</strong> <br /><br /><a href=http://www.TickerFactory.com/><br /><img src=http://tickers.TickerFactory.com/ezt/d/4;10300;6/st/20050624/e/Since We Tied The Knot/dt/7/k/f6c1/event.png border=0 alt= /></a> <br /><br /> <a href=http://www.shinystat.com target=_top><br /><img src=http://www.shinystat.com/cgi-bin/shinystat.cgi?USER=Mirj border=0 alt=Free website counter /></a> <br /><br />What time is it in Ra'anana? <br />
<object width=300 height=25 data=http://www.clocklink.com/clocks/5001-red.swf?TimeZone=IST&Place=&DateFormat=DD-mm-YYYY& type=application/x-shockwave-flash>
<param name=data value=http://www.clocklink.com/clocks/5001-red.swf?TimeZone=IST&Place=&DateFormat=DD-mm-YYYY& />
<param name=src value=http://www.clocklink.com/clocks/5001-red.swf?TimeZone=IST&Place=&DateFormat=DD-mm-YYYY& />
<param name=wmode value=transparent />
</object>
<br /><br /><a href=http://www.wunderground.com/global/stations/40180.html?bannertypeclick=miniWeather2><br /><img src=http://banners.wunderground.com/weathersticker/miniWeather2_both_cond/language/www/global/stations/40180.gif border=0 alt= /><br /></a></p>


