Stuffing Turducken

"Hadice's DH here, hello all. I have been making this recipe every year for the past 4-5 holiday seasons. My family demands I make it at least once a year. I got the recipe from the Salmon family website. Turducken is a chicken in a duck in a turkey. The birds are de-boned and placed one inside the other, layered with stuffing. The outer layer, the turkey, is then trussed up and sewn together to appear as a regular turkey. When you slice it down the middle you will see, in layers, turkey, stuffing, duck, stuffing, chicken, stuffing. A sure crowd pleaser. It is a challenging recipe, time consuming and labor intensive. De-boning the birds is intimidating but gets easy with a little practice. This is a labor of love, but well worth it for a special meal that will have friends and family talking about it until next year. I recommend sticking to the recipe on your first attempt. It is an expensive project to screw up by adding crazy ingredients that don't work.
In addition to the food items, you will need a large roasting pan with rack, cotton string to truss up the turkey, a large needle and cotton thread to sew the turkey together and 1-2 sq ft. of cheese cloth to keep the stuffing in."
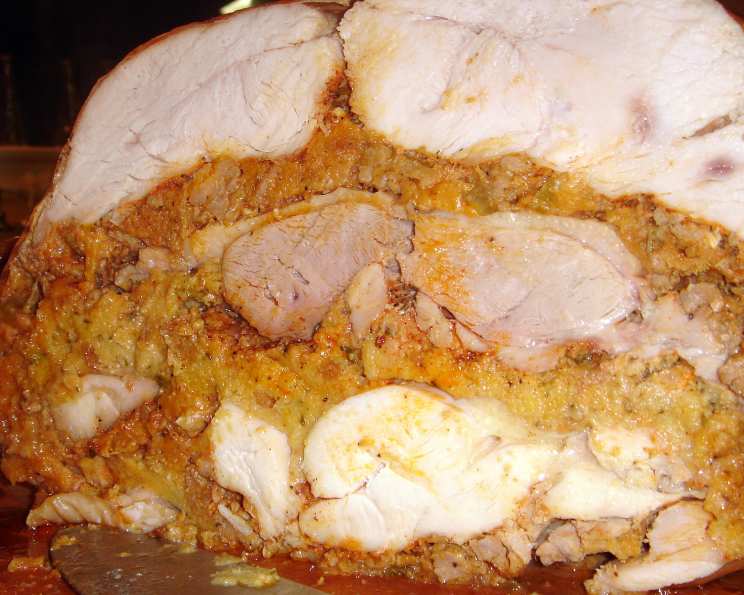
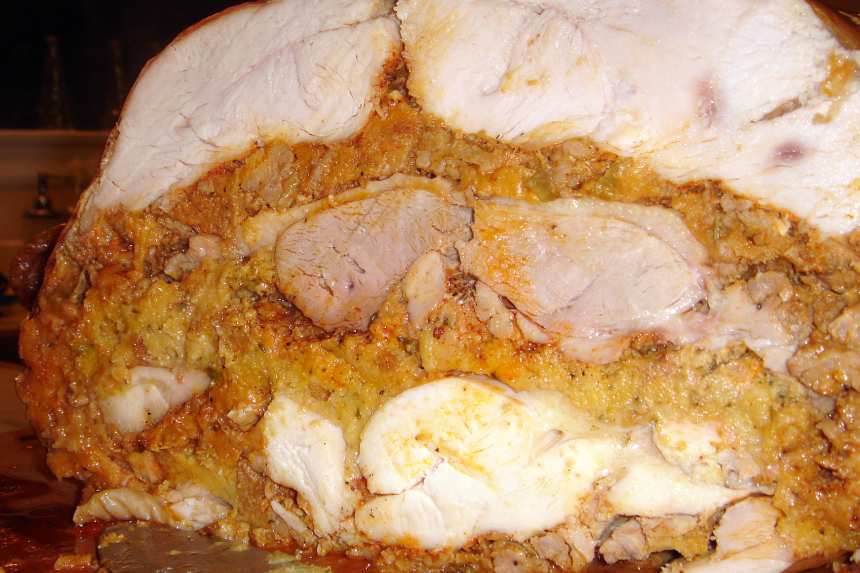
photo by Hadice


- Ready In:
- 13hrs
- Ingredients:
- 16
- Serves:
-
10-15
ingredients
- 1 (18 -21 lb) whole turkey
- 1 (5 -6 lb) ducklings
- 1 (4 -5 lb) whole chickens
- 4 cups cornbread stuffing mix, prepared (I use Stovetop brand)
-
Seasoning Mix
- 2 tablespoons salt
- 2 tablespoons paprika
- 1 tablespoon black pepper
- 1 -2 teaspoon dried thyme
-
Sausage Stuffing
- 2 tablespoons butter
- 3 tablespoons paprika
- 3 cups onions, Chopped
- 1 1⁄2 cups celery, Chopped
- 2 lbs Italian sausage (I recommend medium to spicy)
- 3 tablespoons garlic, Minced
- 3 cups chicken stock
- 2 -3 cups breadcrumbs, Toasted
directions
- De-Bone.
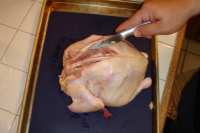
- Sharpen those knives! Maximize your work area so you have plenty of room and light. Use the kitchen table if there's not enough counter space. If it is your first time deboning a fowl, it is advisable to practice first on the chicken rather than the turkey since mistakes will be hidden inside the bigger birds.
- Rinse the turkey and remove the neck and any giblets. Place the turkey, breast side down, on a clean flat surface. Cut through the skin along the length of the spine. Using the tip of a knife and starting from the neck end, gently separate meat from rib cage on one side. Toward neck end, cut through the meat to expose the shoulder blade; cut meat away from and around the bone, severing bone at the joint to remove shoulder blade. Disjoint wing between second and third joints. Leave the wing bones and keep the wing attached to the meat.
- Continue separating meat from frame, heading toward the thighbone and being careful to keep the "oyster" (pocket of meat on back) attached to skin, rather than leaving it with the bone. Cut through ball-and-socket joint to release the thighbone from the carcass (bird will be open on one side, exposing bones left to deal with). Keep the leg attached to the meat.
- Repeat boning procedure on the other side of the bird. Carefully remove the carcass and use it to make stock. Stock is needed for making stuffing and more stock is needed for gravy. To make stock, put the turkey carcass in a large pot and cover with water. Bring to a boil, then simmer on low heat overnight.
- You should end up with a flat boneless (except for wings and legs) turkey with the skin intact in one large piece. Put the boned turkey in a large dish or bowl and cover with plastic wrap to keep it from drying out. Place it in the refrigerator.
- Repeat the deboning process on the duckling and the chicken, but debone both stumps of wings and leg drumsticks. Cut through flesh at the thinnest point and trim around these bones with a knife until they can be removed. (Since they have little meat, we usually cut off the entire wings and add them to the stock pot.) Both the chicken and duck will be stuffed inside the turkey and need not be kept "perfectly" intact.
- Trim excess skin and fat from the birds. Ducks, in particular, have a lot of excess fatty skin that should be saved to render fat to be used later for making gravy. We usually remove most of the skin from the chicken, but keep the duck skin which adds flavor.
- Prepare the seasoning mix and set it aside.
- Make the Sausage Stuffing.
- Melt butter in large skillet over high heat. Add 3 cups onions and 1-1/2 cups celery. Saute until onions are dark brown but not burned, about 10 to 12 minutes. Add 2 lbs sausage (we prefer spicy Italian sausage) to the skillet and cook about 5 minutes or until the meat is browned, stirring frequently. Add paprika (3 tbsp.) and minced garlic (3 tbsp.) and cook approximately 3 minutes over medium heat, stirring occasionally. Stir in 3 cups of stock and bring to simmer. Continue cooking until water evaporates and oil rises to top, about 10 minutes. Stir in 2-3 cups toasted bread crumbs and mix well. Add more bread crumbs if mixture is too moist.
- Prepare a similar amount of another stuffing such as corn bread stuffing.
- Assemble the Turducken at least 11 to 12 hours before dinner.
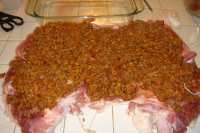
- Spread the turkey, skin down, on flat surface, exposing as much meat as possible. Rub 3 tablespoons of seasoning mix evenly on meat. Spread sausage stuffing over the turkey in an even layer approximately 3/4 inch thick.
- Place duck, skin down, on top of stuffing. Season exposed duck meat with about 1 tablespoons of seasoning mix. Spread corn bread stuffing in an even layer (about 1/2 inch thick) over the duck.
- Arrange the chicken, skin down, evenly on top of corn bread stuffing. Season chicken meat with seasoning mix. Spread remainder of sausage and/or corn bread stuffing on top of chicken.
- With another person's help, carefully lift the sides of the layered birds, folding the sides of the turkey together. Have a helper hold the bird while sewing the opening down the back of the turkey together using cotton thread. The bird may not close perfectly, and a strip of cheese cloth can be used to help close the "crack" in the back of the turkey so stuffing will not leak out when the bird is turned over.
- Since the turducken has no skeleton, it must be trussed up or it may fall apart in cooking. Tie 4-5 pieces of cotton string around the bird, width wise to act as skeletal support. Turn the bird over and place in a roasting rack inside a large roasting pan so it is oriented breast side up and looks like a "normal" turkey. Tie the legs together just above the tip bones.
- Heat oven to 225 degrees F. Temperature control is critical since the turducken is so massive that it has to be cooked slowly at a low temperature to prevent burning the outside before the interior is cooked. Using an oven thermometer is highly recommended. We place 2-3 oven thermometers at different locations within the oven to monitor oven temperature. We also use a meat thermometer inside the bird to measure its internal temperature.
- Place the bird in the center of the oven and bake until a meat thermometer inserted through to center reads 165 degrees, approximately 9-10 hours, though cooking times will vary depending on the size of the birds and amount of stuffing used. Rely on temperature and not time cooked for doneness.
- There will be no need to baste, but accumulated drippings may need to be removed from the pan every few hours so that the lower portion does not deep fry in the hot oil. Save pan drippings for gravy. Remove the turducken from the oven and let cool in the pan for an hour before serving. Make gravy according to your favorite recipe.
- To serve cut bird in half. Carve crosswise so each slice reveals all 3 meats and stuffings.
- Simple Gravy if desired.
- Take 1 cup of pan drippings plus 1 cup of flour and cook over medium heat until "tan". Add 10 cups stock to fat/flour all at once. Whisk thoroughly. Bring back to a boil and then simmer for 5 minute Whisk constantly. Add salt + pepper + paprika "to taste".
- Another simple gravy variation is to use about a quarter to half cup of pinot grigio and about two to three tablespoons of instant potatoes instead of the flour. Test for taste and if it gets too thick add water or more pinot.
- The gravy can be made in advance and allowed to stand over low heat for at least 2 hours (maybe more). We usually make at least two batches.
Questions & Replies

Got a question?
Share it with the community!
Reviews
Have any thoughts about this recipe?
Share it with the community!
RECIPE SUBMITTED BY

<p>I have been married to my amazing husband for 8 wonderful years. We added a baby boy to the mix in March '08 with another just added March '10. We have two adorable rescue dogs, a chihuahua/min pin mix and a yorkie/westie mix. I have been an ovo-lacto vegetarian for 14 years. <br /> <br />After moving to our fourth state in a year, we have finally settled in Texas. I don't know how I like all the rain and the human-sized bugs, but we really enjoy the area we have chosen to live in. Being a vegetarian in this part of the country is HARD. No one quite gets it. <br /> <br />I love testing my zaar recipes on DH. When he loves something he exclaims, Where did you get this recipe?!? and of course, my answer is always the same. <br /> <br /><img src=http://www.enviro-tote.com/imagesNew/stockart/bannerVeggie.gif alt= /> <br /> <br />My ratings system: <br />5***** <br /> I would glady serve this to guests, or make it and secretly eat it all by myself. <br />4**** <br /> Great recipe. Liked enough to print out and place in my permanent cookbook. <br />3*** <br /> Recipe not quite for me, but others might like it. Could be more to my liking with a few modifications. <br />2** <br /> Didn't like. Possible ingredient errors in recipe. Probably wouldn't use again. <br />1* <br /> Really didn't like. Would never use again. <br /> <br />#NOTE# <br />If I review any recipes containing meat, it is a recipe I prepared and DH reviewed. <br /> <br /><img src=http://www.enviro-tote.com/imagesNew/stockart/bannerVeggie.gif alt= /> <br /> <br />Little Italy, San Diego <br /><img src=http://i42.photobucket.com/albums/e342/hadice/Cool/LittleItaly.jpg alt= /> <br /> <br /><img src=http://i3.photobucket.com/albums/y53/DUCHESS13/berriesblinkie.gif alt= /><img src=http://i23.photobucket.com/albums/b399/susied214/projects/untitled_1.jpg alt= /> <br /> <br /><img src=http://i23.photobucket.com/albums/b399/susied214/permanent%20collection/200_artistrichardneuman-art-prints_.jpg alt= /><img src=http://i23.photobucket.com/albums/b399/susied214/permanent%20collection/untitled.jpg alt= /><img src=http://i10.photobucket.com/albums/a132/tgifford/Game%20Room%20Banners/AM%20Banners/KBparticipation.jpg border=0 alt=Photobucket /> <br /> <br /><img src=http://farm4.static.flickr.com/3316/3345270671_dd30334798.jpg alt= /><img src=http://i250.photobucket.com/albums/gg271/MrsTeny/AMpageSticker.jpg alt= /> <br /> <br /><img src=http://i250.photobucket.com/albums/gg271/MrsTeny/Permanent%20Collection/Aug09PaperSwapSticker.jpg alt= /> <br /> <br /><img src=http://i80.photobucket.com/albums/j166/ZaarNicksMom/Animation6.gif alt= /> <br /> <br /><img src=http://i80.photobucket.com/albums/j166/ZaarNicksMom/PACsticker-Adopted.jpg alt= /> <br /> <br /><img src=http://i16.photobucket.com/albums/b2/kiwidutch/my3chefs2009final-1.jpg alt= /></p>


