Vampire's Kiss Cake

"Beware the kiss of the vampire! Or instead you can celebrate it with this gothic homage to October's special, spooky elegance. Halloween comes just once a year, so celebrate with a cake that drips blood with every slice...!"
.jpg)
.jpg)
photo by Milkmoon Kitchen


.jpg)
.jpg)

- Ready In:
- 48hrs 50mins
- Ingredients:
- 18
- Yields:
-
1 Cake
- Serves:
- 20
ingredients
- 6 large egg whites, at room temperature
- 2 large whole eggs, at room temperature
- 2 cups whole milk, at room temperature divided
- 2 teaspoons vanilla
- 6 cups cake flour, sifted
- 3 cups granulated sugar
- 2 tablespoons and 2 tsp baking powder
- 2 teaspoons fine salt
- 1 1⁄2 cups unsalted butter, at room temperature
- 14 cups milkmoon meringue buttercream for frosting
- 1 teaspoon lemon extract
- 1⁄2 teaspoon almond extract
- 1⁄2 cup corn syrup
- 2 -3 tablespoons cornstarch
- red food coloring
- purple food coloring
- green food coloring
- silver candy sprinkles
directions
- —Make Your Batter—.
- Preheat your oven to 350°C Prepare 4 (or however many you have) six inch round, three inch deep (6”x3”) cake pans by greasing with shortening, placing a baking paper round on the base, greasing again, and flouring. I know it’s a lot just to prep the pan, but you will never have cake stuck clinging to your pan ever again! Worth it.
- In a medium-size bowl, combine your egg whites, whole eggs, 1/2 cup of your milk, and vanilla, lemon extract, and almond extract, and whisk to combine. Set aside.
- In the bowl of a stand mixer fitted with the paddle attachment, combine your cake flour, sugar, optional whole milk powder, baking powder, and salt and mix on low speed for a few minutes until combined. Low speed is important here so as to avoid creating a burst of flour that will get all over your hair and maybe in your eyes, it is the worst.
- All at once, add in your butter and keep mixing to moisten your dry ingredients, about 20 seconds. Begin streaming in your remaining 1 1/2 cups milk, half a cup at a time, continuing to beat on the lowest speed. When all the milk is added, raise the mixer speed to medium and continue to beat the batter for about 1 minute. This process is important because it incorporates air into your batter. Don’t worry about developing too much gluten—cake flour has less than regular all-purpose.
- Scrape your bowl, and then return the batter to low speed. Add your egg mixture in three batches, allowing each to incorporate fully before adding the next.
- I like to beat again here on medium for about 20 seconds just to make sure the batter is totally homogenous!
- —Bake Your Cake—.
- Divide your batter between your prepped pans and smooth the tops.
- Bake for roughly 40-50 minutes, but keep an eye on them starting at minute 30. You’ll know they’re baked when you press down in the center of each cake and it springs back. You can also insert a cake tester, and it should come out clean with at most a few crumbs clinging to it.
- Remove your cakes from the oven and allow to come to room temperature on a rack. Then, I like to wrap them up in plastic and put them in the fridge for at least half an hour, preferably overnight before I remove them from the pans.
- Wrap each cake individually in plastic and put it in the refrigerator for at least 3-4 hours before stacking. Whether in the pan or just wrapped in plastic, these cakes should rest in the fridge for at least 8 hours total before stacking.
- —Make Your Buttercream—.
- Whip up some Milkmoon Meringue Buttercream (recipe #536136), you'll need 2.5x the amount listed in the recipe. Reserve 5 cups of this buttercream for your filling, and set the rest aside.
- —Make the Blood—.
- Pour your corn syrup into a bowl, and add a small squirt of red food coloring. If you are using gel color, this may be enough! If you are using a water-based coloring, you may need quite a bit to achieve a deep, bloody red color. Bonus points if you add a tiny, tiny touch of blue to give depth to your syrup.
- Mix in a tablespoon of or cornstarch, and test for thickness. You can leave thickness up to your best judgement, but you want a nice ooze to it, without being too runny. A good test is that a drizzle of syrup from a spoon should take a full second to melt back into the syrup in the bowl. Add more cornstarch if you need to! Then, when you have a nice oozey consistency, set aside.
- —Prep Your Layers—.
- Start by trimming the domes off your chilled cakes. We want flat disks of cake so we can accomplish a tall build!
- Now torte your layers out. Torting is the process of cutting a large chunk of cake into smaller layers, and it’s kind of my jam. I torted ten very thin layers of blue and four of orange cake for Frida’s birthday cake, and even trimmed the brown bottom off each cake too. You can choose to just trim the domes and leave as-is, or torte each cake in half. The most important thing is that pretty color, so don’t sweat it if you don’t have time to torte like crazy.
- —Build Your Cake—.
- Alright, all that leveling of your layers finally pays off! Stack your layers on a 7” or 8” round cake drum with a small dab of buttercream in the middle to anchor the cake. Spread a very thin layer of buttercream from the 5 cups you set aside for the filling between each layer until you've used up about 1/3 of your torted cake layers. Spread buttercream on top of the layers you've built up so far.
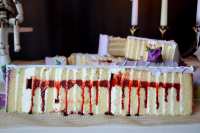
- Now for the fun part: let's get bloody! This part is a little tricky, so here's what we're trying to do: we are creating little chambers within the buttercream layered extra-thick between two cake layers, so that we can fill those chambers with blood syrup. When you cut the cake into slices, you will burst these chambers open, and blood will ooze out when the slice is removed. The chambers are important here because if you just pour a giant pool of blood between two cake layers, when the cake is cut all the blood will run out at once and threaten the structural integrity of the cake!
- Scoop about a cup of buttercream into a pastry bag and cut the tip off to create about a 1/4" hole at the end. Pipe a ring of buttercream around the top of the stack of cake you've built up, creating a dam around the edge. Build that dam in by about an inch to thicken it. Pipe another ring of buttercream in the middle, and fill it in so the center is totally covered.
- You should aim to have a one- to one-and-a-half inch wide trough that forms a ring in the buttercream now. In order to create the chambers that will hold your blood syrup, pipe lines that join the center buttercream circle with the outer ring. Ideally you want 5-6 equally-sized sections formed. Refer to the image in the gallery above so you can see exactly what sort of pattern you should be aiming for here.
- Carefully spoon your blood into each chamber you've created, filling almost to the top but not quite. Spread a very thin layer of buttercream onto the bottom of one of your slices that's waiting to be stacked, and place it buttercream side down on top of the blood chambers you've created. Press gently to ensure that you are sealing the blood fully within the buttercream.
- Now refrigerate your stack until the buttercream is firm, about 10-15 minutes.
- Continue with your normal layering until you've used up 2/3 total of your cake layers, and repeat the blood chamber process. Then, continue stacking until you have just one or two layers left to stack, and create a third and final blood chamber layer. Stack your final two layers and refrigerate the whole cake for at least 1/2 hour.
- Remove from the refrigerator when the cake doesn’t wiggle when you shake it, and place it on a turntable on the counter. Using a serrated knife, go around the cake trimming off those crusty sides. Wrap the nude cake in plastic, and put it back in the refrigerator.
- —Frost Your Cake—.
- Combine any remaining buttercream from your filling with the buttercream you had set aside.
- From your total remaining buttercream, remove 1.5 cups and set it aside. Color the rest a light purple. Frost your cake and smooth with an extra-tall scraper, or you can opt to diy it like I do with a 14” quilting ruler! Frost as cleanly as you can—you want your cake looking smooth and beautiful. Put the cake back in the refrigerator to firm up.
- Set any remaining purple buttercream aside.
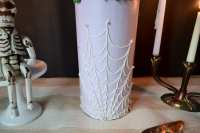
- —Pipe the Spiderweb Lace—.
- Place one cup of the white buttercream you set aside in a pastry bag fitted with an Ateco 6 round tip, or just cut a 1/8" hole in the tip of a disposable one. Pipe the base of the web by creating thin rays of buttercream on the side of the cake. Then, connect the rays by piping "U" shapes between them, creating a spiderweb look.
- Finally, pipe a small dot of buttercream at the end of each ray, and place a silver pearl on each for some extra glamor!
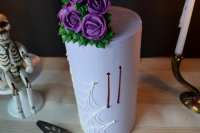
- —Pipe Your Gothic Roses—.
- Take your remaining purple buttercream and add more purple coloring to achieve a deeper color.
- Place your green buttercream in a piping back outfitted with a coupler, and attach a medium round tip (like an Ateco #10-12) and pipe small clusters of bulbs in between the flowers to make buds. Use your white buttercream to pipe a smaller white spot on top of each bud using the same size tip or one slightly smaller.
- Place your purple buttercream into a piping bag fitted with a medium or large petal tip—I used an Ateco 127. Pipe your roses on to small squares of parchment paper and freeze until firm.
- Color half of you remaining white buttercream a deep leaf green and place in a piping bag fitted with a medium or large leaf tip—I used an Ateco 112.
- Mound remaining white buttercream onto the top of the cake to create a nice pillow for your roses. Arrange them quickly, pressing each lightly into the buttercream to make sure it sticks. Use your green buttercream to fill in any gaps with piped leaves.
- —Create the Vampire's Kiss—.
- With a small paring knife, carve two small holes in your buttercream to mimic the puncture mark of a vampire's teeth in the side of the cake. Shortly before serving the cake, using pipette, squeeze bottle, or even a plastic straw, wooden skewer, or toothpick, allow two small drips of blood to ooze from the holes. Only use a little bit of blood syrup for each so the drips don't quickly ooze al the way down the side of the cake.
- Now don your fanciest cape and sharpen your teeth, and you are ready to delight your guests with this terrifying treat!
- Enjoy!
Questions & Replies

-
 Where can i get it book?
Reviews
-
 I haven't made it but I would either use real fruit jam like raspberry and strawberry and black grapes or whatever red fruit you can find mush the fruit and boil and add sugar and water and maybe some syrup just a tad and blend well. Or mix the jams together and blend together. Or you could also use Jolly ranchers red ones and a little corn syrup and or cornstarch for thickener and some water and melt on stove and add some jam in there as well. I'm gonna tackle this for a church party and see how it turns out.
RECIPE SUBMITTED BY

Milkmoon Kitchen
New York City, New York
I dream in buttercream =)
IG @milkmoonkitchen
.jpg)
